Azure AD business-to-business (B2B) guest user accounts are a terrific way to securely grant access to apps and services for external users and partner organizations. Guest user accounts are created in Azure AD by first issuing the invite to an external user, which is then redeemed and authenticated via their own (supported) IDP – for example, by using an external Azure AD instance or a consumer Microsoft Account.
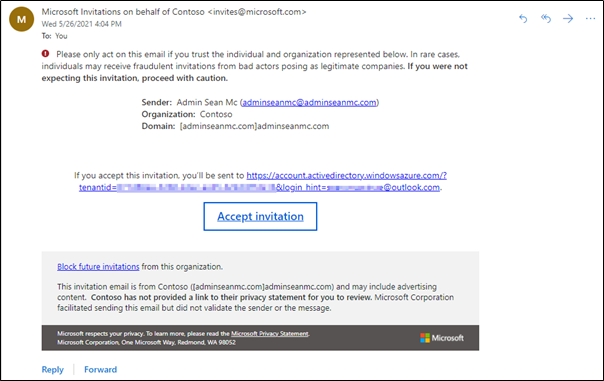
Invitations are typically sent using a standard email template and can contain a small amount of custom text to help the recipient understand what to do next:

For sending a small number of invitations this process is completely fine, however, there are some more complicated use-cases where additional flexibility is needed. Some examples of where additional functionality may be needed are:
- When many guest users need to be invited to the tenant in bulk in order to use a new business app
- When more detailed onboarding instructions are required for external users
- When an in-house application needs the ability to automatically provision guest accounts
- When automating Guest User invitations in multi-tenant environments to allow collaboration
To help with this, I have created a script using PowerShell and Graph API to create guest user invitations automatically. The script also contains the option to prevent the email invitation from sending and returning the redemption URL so that it can be sent as part of a custom onboarding communication.
Prepare the Environment
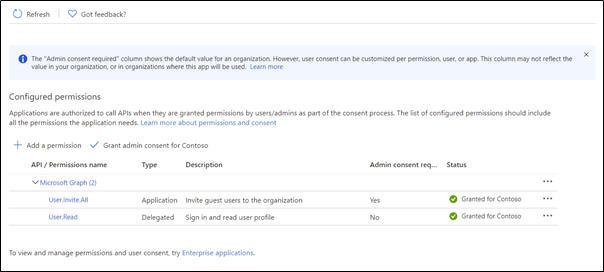
As the script uses Graph API to create the invitation, a new Azure AD registered app is needed. For the basics on how to create the app, you’ll want to follow the instructions outlined in this article. When assigning permissions, the only entry needed is User.Invite.All Application Permission:

Now that the app is created, make sure you take note of the Client ID, Tenant ID, and Client Secret. These values are needed to allow the script to authenticate with Azure AD.
Running the script
To run the script, the following parameters are required:
- UserDisplayName – The display name for the guest account
- UserEmail – The email address of the external user
- ClientSecret – The Client Secret from the app registration
- ClientID – The Application (Client) ID from the app registration
- TenantID – The Directory (Tenant) ID of the Azure AD Tenant
- SendInvite – Setting this value to $true will send the automated email, $false will return the redemption URL to the screen
The following parameters are optional:
- (Optional) RedirectURL – A URL to redirect the user to after they redeem the invitation. This will default to “https://myapps.microsoft.com”
- (Optional) UserMessage – A message to be added to the automated email
Once the parameters are in place, download the script from GitHub and run it as shown in the below example:
##Declare Parameters##
$UserDisplayName = “(Guest) Sean McAvinue”
$UserEmail = “Adminseanmc@adminseanmc.com”
$clientSecret = <Client Secret Value>
$clientID = <Application (Client) ID Value>
$tenantID = <Directory (Tenant) ID Value>
$SendInvite = $True
$RedirectURL = “https://seanmcavinue.net”
$UserMessage = “You have been invited to collaborate with Contoso. Redeem this invitation to get started and you’ll be redirected to our corporate website!”

##Run Script’’
.\graph-CreateGuestUserInvitation.ps1 -UserDisplayName $UserDisplayName -UserEmail $UserEmail -ClientSecret $clientSecret -TenantID $tenantID -ClientID $clientID -SendInvite $SendInvite -UserMessage $UserMessage
This will create the invitation and send it using the standard template. The script will output the details of the invitation to the screen for review as shown below in Figure 3:

The script can also be run with the Sendinvite flag set to $false. This will prevent the automated email from sending and will return the redemption URL for the invitation to the screen:

The redemption URL can then be sent separately along with any instructions or policy documentation that is required. The script can be expanded on to fit some of the requirements previously mentioned. For instance, a CSV could be used to provision guest accounts in bulk quite easily:
##Import a CSV with the following headers “Displayname”,”Email”,”Message”
$CSV = Import-Csv ExternalUsers.csv
##Loop through CSV and send invites##
Foreach($user in $csv){
.\graph-CreateGuestUserInvitation.ps1 -UserDisplayName $User.DisplayName -UserEmail $User.Email -ClientSecret $clientSecret -TenantID $tenantID -ClientID $clientID -SendInvite $true -UserMessage $User.Message
}
When creating a guest user across multiple tenancies, an application registration is needed in each tenant and then the script can be run in a loop to provision in each tenancy:
##Declare Parameters##
$UserDisplayName = “(Guest) Sean McAvinue”
$UserEmail = Adminseanmc@adminseanmc.com

##Create Tenant Details Object Array##
$TenantDetails = @([PSCustomObject]@{
    clientSecret = <Tenant 1 Client Secret>
    clientid = <Tenant 1 Client ID>
    tenantid = <Tenant 1 Tenant ID>
},
[pscustomobject]@{
    clientSecret = <Tenant 2 Client Secret>
    clientid = <Tenant 2 Client ID>
    tenantid = <Tenant 2 Tenant ID>
})
$SendInvite = $True
$RedirectURL = “https://seanmcavinue.net”
$UserMessage = “You have been invited to collaborate with Contoso. Redeem this invitation to get started and you’ll be redirected to our corporate website!”

##Loop through tenants##
Foreach($tenant in $TenantDetails){
##Run Script’’
.\graph-CreateGuestUserInvitation.ps1 -UserDisplayName $UserDisplayName -UserEmail $UserEmail -ClientSecret $$tenant.clientSecret -TenantID $tenant.tenantID -ClientID $tenant.clientID -SendInvite $SendInvite -UserMessage $UserMessage
}
Summary
This script can be used to automate the guest user invitation process and integrate it more seamlessly with any custom applications. It can also be used to provision a large number of guest accounts quickly and easily.
The script can be downloaded from GitHub.
Note: As always, make sure to review and test any code before running it in a production environment.


Hi, is it possible to change the invitation layout? I know we can customize the message, language etc, but is it possible to put logo of the company in the invitation?
If you set “send message” to false and just copy the redemption URL then you can send that link in your own custom email.
We are using management accounts for management tasks.
But I don’t want Guest users to reply to that account if they have questions.
So I would like to (only) change the From address to ie servicedesk@mycompany.com.
(and change the language of the Invite to my country)
It would be so nice if that could be done.
You would need to choose not to send the invitation automatically and then send out the redemption URL in a custom mail from your shared mailbox
I am enabling guest accounts for B2B access to internal SharePoint resources. From what I can tell, based on comparing similar documentation from Microsoft and my own testing, I don’t need to complete the “Prepare the Environment” step for this use case. Is that correct or am I missing something?
Hi Jon,
If you re doing this manually then you don’t need this script.
Can you share details on how Powershell was connected to your AAD ? Share a working script without comments.
PowerShell is not connected to AAD, it’s using Graph API calls – the setup is detailed in the “Prepare the Environment” section
Fantastic work Sean ! saved me a lot of time of R&D and really appreciate you putting it altogether.
Can this be used to send invites to access internal APIs in Azure AD? If so, once a user accepts an invite, do they get back a security token to access the APIs? So, going forward, they can just use the security token?
No, this would just provision the B2B Guest account, any access to specific workloads / APIs would need to be done separately