Searching for Cost-Effective Test Environments
Many of us encounter scenarios where a company uses their production environment for testing. In other words, the live environment becomes the lab. While this may be an economic reality for some, there are alternatives worth exploring to deliver suitable lab setups without breaking the bank.
The purpose of a lab is to have an environment safe for testing that doesn’t impact production services. Different scenarios create different requirements. For instance, to test SMTP submission via telnet, we don’t need complexity. On the other hand, to test Database Availability Group (DAG) updates and patching, we need at least a two-node DAG.
Microsoft’s minimum recommended guidance for Exchange 2019 is 128 GB of RAM, used to cache large amounts of data in memory. My original 32 GB Hyper-V host, capable of running three Virtual Machine scenarios with a Domain Controller, an Exchange server, and a Windows 10 Client, didn’t work because of the memory requirement.
Before I describe my solution, I should explain why and how. Exchange Server on-premises organizations need somewhere to test scenarios like updating Exchange, testing configurations, and running the occasional “what-if” type of testing. For example, what happens if I patch a DAG node and the database indexes become corrupted or the patch introduces a rolling reboot, or I’d like to test if my disaster recovery procedures work? This article provides more guidance specifically around building an Exchange 2019 lab environment, based on my experience.
A Segway into Maturity
Mature environments tend to have several tiers of use. When writing code, we might use four or more tiers of testing, including User Acceptance Testing (UAT), but for the purposes of testing Exchange 2019, we limit ourselves to three:
- DEV – or development – the least safe code runs here. These environments are often torn down after being used to test a specific scenario.
- TEST – as the name implies, this is where we validate code after running it in development to ensure it is production-ready. Typically, these environments are closer in their characteristics to what’s seen in production, even if the test servers are virtual and the production servers are physical.
- LIVE – or production! We are no longer testing. In this tier, software and processes run which are good to go onto production machines.
The guidance offered here for Exchange 2019 fits into the first two scenarios, DEV and TEST. At a later stage, I provide direction for implementing a safe TEST environment.
Read more: How to Configure Exchange Server 2019 for SMTP Anonymous Relay, which covers how to test this scenario based on the AutomatedLab framework.
Repeating the Past
Steve Goodman’s excellent article about building a cheap lab server for less than $500 explains the kind of physical environment you need. Assuming you have either such server or are using Hyper-V (or would LIKE to use Hyper-V) for your testing, but not concerned with permanent lab hardware. Also assuming you would benefit from knowing how to build a lab to test Exchange, even if not using our scripts. By the end of this article, you should have the knowledge you need for an Automated lab platform running on hardware or a Nested Virtual Machine Host in Microsoft Azure.
If $Lab = “Hardware”
Building a lab with physical hardware is amazingly easy! After installing Windows Server 2016/2019/2022/Windows 10/Windows 11, open an elevated PowerShell session and run the following to install PowerShell and DCIM, then reboot as needed:
Install-WindowsFeature -Name DHCP,Hyper-V  –IncludeManagementTools
dism /Online /Enable-Feature /FeatureName:Microsoft-Hyper-V /All
Before doing anything else, ensure that you understand where you would like AutomatedLab to store ISOs and Virtual Machines. You could use a larger slower disk as your ISO drive and a fast SSD for your lab virtual machines. In my case, I use a single large SSD for both.
It would be tempting to navigate to the Automated Lab installation page and rush forward but don’t. The installation page refers to two installation types, MSI and PowerShell. After using both methods, I can say that friends do not let friends install PowerShell modules using MSI installers. The simple reason is AutomatedLab is primarily PowerShell based, which makes updating using MSI methods and setting environmental variables like paths and drives a real pain.
During the installation use the following to set drive E as the location ISOs and source scripts reside:
New-LabSourcesFolder -DriveLetter EEach self-contained Automated Lab set defines the LAB location by running the New-LabDefinition cmdlet using the -VmPath parameter. For Example:
New-LabDefinition -Name LabEx2019 -DefaultVirtualizationEngine HyperV -VmPath 'E:\AutomatedLab-VMs'NOTE: The installation of Automated-Lab configures several local machine policies to enable lab host remoting. If these policies are outside of the scope of your on-premises security policies, then consider running an isolated environment in Azure.
Below is an abbreviated version of the script – removing the Linux references, as well as setting the LabSources Folder to the E: drive:
Install-PackageProvider Nuget -Force
# SkipPublisherCheck: AutomatedLabTest requires Pester v5. On system where Pester v3 is still the only versions, you will get an error if the parameter is not present
# AllowClobber: On some occasions, other modules seem to have published ConvertTo-Json/ConvertFrom-Json, which is overwritten by Newtonsoft.Json
Install-Module AutomatedLab -SkipPublisherCheck -AllowClobber
#region Non-interactive host
# Pre-configure telemetry
if ($IsLinux -or $IsMacOs)
{
    # Disable (which is already the default) and in addition skip dialog
    $null = New-Item -ItemType File -Path "$((Get-PSFConfigValue -FullName AutomatedLab.LabAppDataRoot))/telemetry.disabled" -Force
    # Enable
    $null = New-Item -ItemType File -Path "$((Get-PSFConfigValue -FullName AutomatedLab.LabAppDataRoot))/telemetry.enabled" -Force
}
else
{
    #  Disable (which is already the default) and in addition skip dialog
    [Environment]::SetEnvironmentVariable('AUTOMATEDLAB_TELEMETRY_OPTIN', 'false', 'Machine')
    $env:AUTOMATEDLAB_TELEMETRY_OPTIN = 'false'
    # Enable
    [Environment]::SetEnvironmentVariable('AUTOMATEDLAB_TELEMETRY_OPTIN', 'true', 'Machine')
    $env:AUTOMATEDLAB_TELEMETRY_OPTIN = 'true'
}
# Pre-configure Lab Host Remoting
Enable-LabHostRemoting -Force
# Using Azure: Pre-configure Lab Sources Synchronization
# Get/Set/Register/Unregister-PSFConfig -Module AutomatedLab -Name LabSourcesMaxFileSizeMb
# Get/Set/Register/Unregister-PSFConfig -Module AutomatedLab -Name LabSourcesSyncIntervalDays
# Get/Set/Register/Unregister-PSFConfig -Module AutomatedLab -Name AutoSyncLabSources
#endregion
# Windows
New-LabSourcesFolder -DriveLetter E
Figure 1 shows the kind of installation output you can expect:
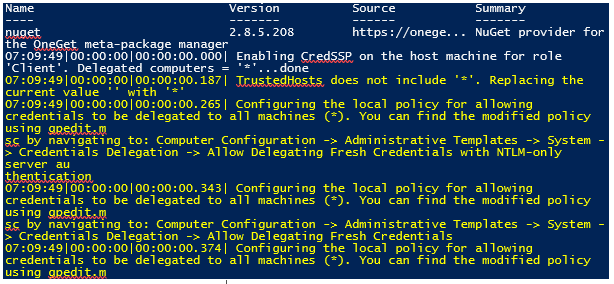
Next, you should read the Automated Lab Getting Started page. This is a guide to copy your desired operating systems ISO’s into E:\LabSources\ISOs, where “E:” represents the drive letter you defined using the New-LabSources cmdlet. The Getting Started page also contains advice about testing ISOs and installing the first lab, plus a few more essential skills like deleting labs when finished.
The hardware portion of this installation is effectively done. To start, download the sample Exchange 2019 script from AutomatedLab or use one of the Practical 365 Scripts.
If $Lab = “Azure”
Starting with Azure is also amazingly easy. Yes, I know I’m repeating myself, but consider not having to buy or deploy any physical hardware. In this scenario, I use a nested virtualization host in Microsoft Azure. I do recognize that this approach is akin to putting lipstick on a pig in terms of not utilizing the Azure fabric to create and maintain virtual machines. However, the point being is that we reuse everything we know about on-premises virtualization without changing a line of code on our existing labs.
Networking restrictions in Azure are something we need to be aware of to ensure labs work. The guests we create use internal virtual switches only and will not be exposed to the internet or other Azure subnets.
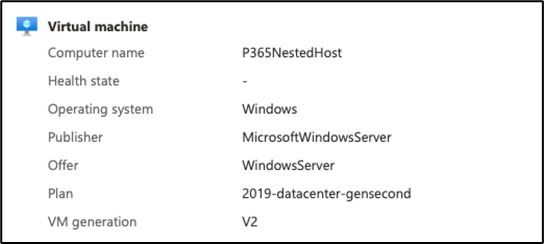
Therefore, it’s critical to start with a Virtual Machine series that is Hyper-threaded and capable of running nested virtualization. In my example, I selected a “Standard E16-4ds v5” (4 vcpus, 128 GiB memory) running Windows Server 2019 (Figure 2:)
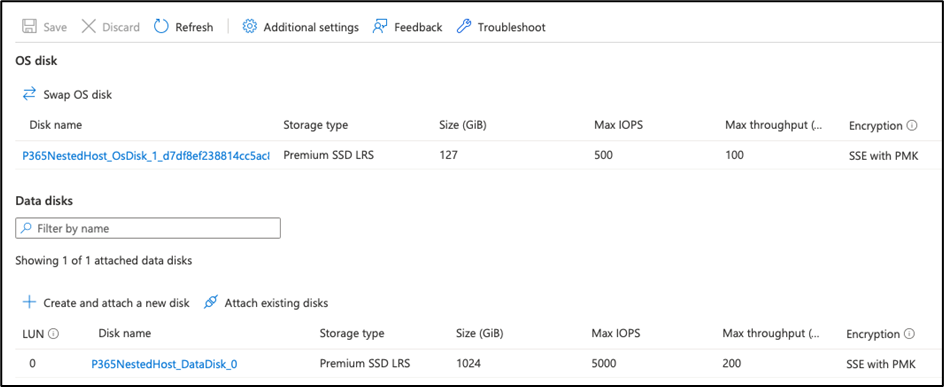
The Virtual Machine with SSD based storage which is critical for our lab’s performance. A single disk cannot deliver the number of IOPs we need, nor is it large enough, so we add an additional disk to the VM. I allocate the “E:” drive letter to keep all lab configurations consistent (Figure 3:)
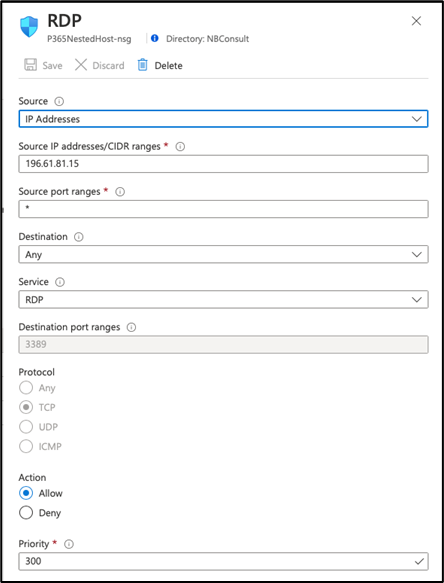
Since we use RDP, we immediately edit the default network configuration. The first rule is, we need to edit the rule (Figure 4). If you choose to leave this rule as it is, you can expect your host to be compromised in short order, or at minimum – face potentially exposure to RDP brute force attacks.
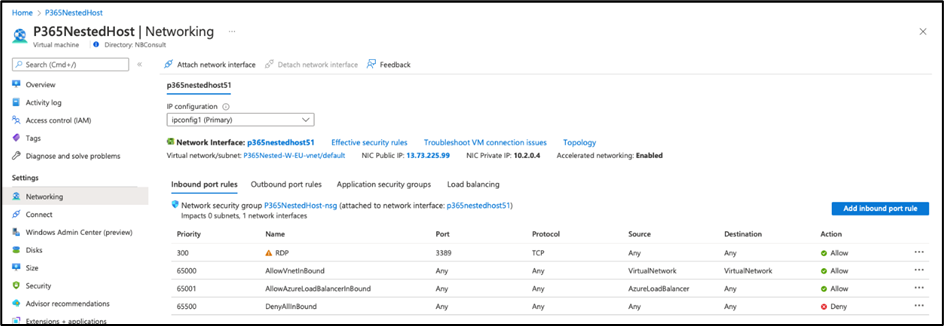
Editing the rule uses the dialog shown in Figure 5. You should change the source to be your external IP and save the updated configuration.
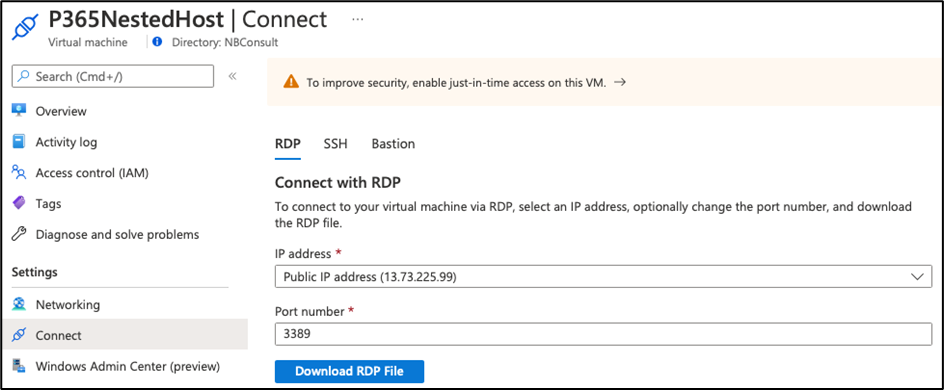
Next, navigate to the connect tab, which shows the RDP download as the first option. Go ahead and download the RDP file and connect to your new lab host (Figure 6:)
Continue with your Hyper-V installation as documented earlier.
If you follow the guidance, the result is a Hyper-V capable host configuration, capable of executing the automated lab scenarios for Exchange 2019. The host doesn’t take long to spin up, and it’s also easy to delete when testing is complete.
Conclusion for Exchange 2019 Lab Environment
This article discussed the need for repeatable lab scenarios, requiring the creation of a lab platform when needed and disposal of it once completed. I explained how to create the lab platform on both physical hardware and Azure Virtual Machines capable of nested virtualization, based on my experience.
The upside of the Azure approach is the sheer convenience of being able to spin up a lab to test the desired scenario at will. The downside of this convenience is that it is potentially expensive, especially when you leave your virtual machine running. For this reason, Azure is a convenient solution for a short-term lab testing scenario, such as your DEV and TEST tier, but might not be the best choice for long term use.