Control Your Configuration as Migrations Unfold
It can be quite a challenge to maintain workload configurations in a Microsoft 365 tenant. Small to medium size organizations might have administrators responsible for the management of the entire tenant. Large enterprise organizations might assign different people to manage different workloads. All share a common responsibility of keeping administration and configuration consistent. Tenant-to-tenant migrations bring an additional layer of complexity because tracking change is important in any Mergers, Acquisitions, and Divestitures (MAD) project.
In this article, I review how Microsoft 365 Desired State Configuration (DSC) can help ease configuration and administration during tenant-to-tenant migrations.
What Is Microsoft 365 Desired State Configuration?
Desired State Configuration (DSC) first appeared in Windows PowerShell 4.0. DSC configurations are a declarative type of PowerShell script that configure instances of code and the resources to support this code in the proper (desired) state. Resources contain the code that keeps the target of a configuration in place and resides in PowerShell modules written to model a type of configuration.
A Local Configuration Manager (LCM) component runs on a system where the DSC is configured and interacts between resources and configurations at a set polling interval. If the LCM detects that a system is out of state with the desired configuration, it calls the code in the resource modules to update the configuration into the desired state.
DSC is used by many Microsoft technologies, such as Windows Server components and on-premises versions of Exchange Server and SharePoint Server, with dedicated modules available for each product. The modules in Microsoft 365 DSC support the different workloads within a tenant.
Why Use Microsoft 365 Desired State Configuration?
A tenant-to-tenant migration can span some or all workloads. Microsoft 365 DSC can extract a configuration of attribute settings for a workload from the source tenant and upload that configuration to the target tenant.
Initial configuration deployments can take anywhere from 3-5 minutes to 50-60 minutes depending on how many workloads and resource parameters within the workloads are deployed. After collecting a configuration, you can apply it to a target. If the target tenant accepts the configuration, the settings are applied there. On the other hand, if the settings conflict with the configuration in the target tenant, that conflict must be resolved by an administrator.
Examples include Azure groups for group-based licensing, Azure AD conditional access policies, Exchange mailbox plans, Exchange authentication policies, etc. If an organization moves to a new tenant created from scratch, DSC can help by applying configuration settings to the workloads in the new tenant.
Build a Microsoft 365 DSC Environment
Microsoft 365 DSC supports PowerShell versions 5.1 and 7.1 The minimum server OS level needed on the server hosting the DSC configuration is Windows Server 2016 due to the PowerShell requirements. The requirements to connect PowerShell to the supported Microsoft 365 workloads are available online.
Microsoft is working to support modern authentication for all DSC workloads. For now, basic authentication (username and password) is supported for most workloads but is the least preferred security option. A more preferred and scoped model requires the creation of an Azure AD registered app with the necessary API permissions granted to the app, which then allows the use of certificate-based authentication.
You can protect the PFX on the DSC server and hash out the thumbprint if needed in the DSC configuration. Follow the steps in this article to create the Azure AD app. Note the tenant ID, the client application ID, and the certificate thumbprint or client secret if used. You will need to create a registered application in both the source and target tenants with the same API permissions.
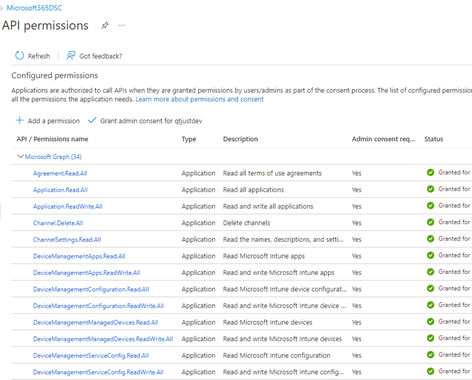
To grant permissions to the application, check the documentation for the resources you want to include in your configuration. In a tenant-to-tenant migration, the most common workloads are Exchange Online, OneDrive, Teams, and SharePoint Online. Figure 1 shows an example of the permissions granted to a registered app used with Microsoft 365 DSC.

To help build out an overall tenant configuration, you can include other workloads like Microsoft Purview, Intune, and Azure AD. You could pull the RBAC access for compliance solutions or group administration from Intune and Azure AD along with conditional access policies to set in the target tenant.
To install the Microsoft 365 DSC module, open a PowerShell window as an administrator and run the command:
Install-Module Microsoft365DSC -Force
You can also install the dependent workload modules by running (Figure 2):
Update-M365DSCDependencies

Microsoft Platform Migration Planning and Consolidation
Simplify migration planning, overcome migration challenges, and finish projects faster while minimizing the costs, risks and disruptions to users.
Export Your Source Tenant DSC Configuration and Import to The Target Tenant
To export a configuration from the source, use the export tool from the Microsoft 365 DSC website. Log in using your source tenant credentials, and you will see all workloads and resources within the workloads that you can export from the tenant. You then choose the configuration for the export. For instance, you can select application and certificate authentication and provide the application ID, certificate thumbprint, source tenant ID, and the resources to export.
The tool creates a Microsoft 365 DSC PowerShell cmdlet named Export-M365DSCConfiguration, which you will copy and paste into PowerShell on your machine to run the cmdlet. The cmdlet exports a configuration from the environment that you choose to log in with (source tenant) to the chosen directory path. If you do not specify a FileName parameter in the Export-M365DSCConfiguration cmdlet like the example below, then the default M365TenantConfig.ps1 name is used. The Export-M365DSCConfiguration cmdlet also generates a configuration data file named ConfigurationData.psd1.
Export-M365DSCConfiguration -ApplicationId “ID of Application” -TenantId “ID or Name of Tenant” -CertificateThumbprint “ThumbprintOfCertificate” -Components @("AADApplication", "AADAuthorizationPolicy", "AADConditionalAccessPolicy", "AADGroup", "AADTenantDetails", "EXOAcceptedDomain", "EXOCASMailboxPlan", "EXOCASMailboxSettings", "EXOEmailAddressPolicy", "EXOHostedOutboundSpamFilterRule", "EXOInboundConnector", "EXOIntraOrganizationConnector", "EXOJournalRule", "EXOMailboxPlan", "EXOMailboxSettings", "EXOMobileDeviceMailboxPolicy", "EXOOnPremisesOrganization", "EXOOrganizationConfig", "EXOOrganizationRelationship", "EXOOutboundConnector", "EXOOwaMailboxPolicy", "EXOPartnerApplication", "EXOResourceConfiguration", "EXOSharedMailbox", "EXOTransportConfig", "EXOTransportRule", "ODSettings", "SPOAccessControlSettings", "SPOBrowserIdleSignout","SPOHomeSite", "SPOHubSite", "SPOOrgAssetsLibrary", "SPOSearchManagedProperty", "SPOSearchResultSource", "SPOSharingSettings", "SPOSiteDesignRights", "SPOSiteScript", "SPOStorageEntity", "SPOTenantCdnEnabled", "SPOTenantCdnPolicy", "SPOTenantSettings", "SPOTheme")
After exporting the source tenant configuration, browse to the folder where the scripts were created and open ConfigurationData.psd1. Look for a section called NonNodeData, which contains the following (if you use an application and certificate thumbprint):
- OrganizationName – the onmicrosoft.com domain name of the tenant
- ApplicationID – The client ID of your Azure AD application
- TenantID – The directory ID or domain name of the tenant
- CertificateThumbprint – the thumbprint of the certificate used in your Azure AD application
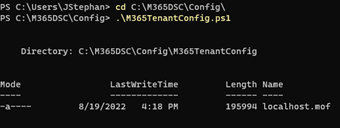
You must update these parameters with the values of your target tenant, application ID, and certificate thumbprint and save ConfigurationData.psd1. Then, run the M365TenantConfig.ps1 script. After M365TenantConfig.ps1 finishes, a localhost.mof file is available in a new subfolder called M365TenantConfig (Figure 3).

To apply the configuration, run the following cmdlet (the Path parameter is the directory location where the .mof file is located after executing the M365TenantConfig.ps1 script)
Example:
Start-DSCConfiguration -Path C:\M365DSC\Config\M365TenantConfig -Wait -Verbose -Force
If you see a yellow PowerShell output, you know that the configuration is working. Errors are shown in red text. Depending on the size of the MOF file and the resources within the MOF file, the script might take from 3-5 minutes to up to 60 minutes. The exact time depends on how many resources were selected from each workload and the amount of data that must be applied to the target tenant from the configuration.
Once complete, the LCM on the machine attempts to enforce the configuration every 15 minutes (the default interval). You can choose to leave the default configuration interval and enforcement check settings in place or to apply the configuration to the target tenant as a one-time import.
Following a one-time import, you must remove the configuration monitoring from the LCM by running the following cmdlets:
Stop-DSCConfiguration -Force
Remove-DSCConfigurationDocument -Stage Current
If you want to create a configuration report to view in HTML or Excel format and compare configurations between the two tenants after you have imported a successful configuration to both, check out this article here.
Join Me at TEC 2022 in Atlanta for More!
There are multiple use cases in environments where Microsoft 365 DSC is helpful for the configuration and administration of standards and policies. If you are in any scenario where you find this kind of information useful to solve configuration problems, join me in my session on Microsoft 365 DSC: How to Set Up an Office 365 Tenant from Scratch and Stop Configuration Drift at the experts at The Experts Conference 2022!
On Demand Migration
Migrate all your workloads and Active Directory with one comprehensive Office 365 tenant-to-tenant migration solution.


