Avoid Compliance Nightmares with Microsoft 365 Multi-Geo
Many organizations have data residency requirements. With Microsoft 365 Multi-Geo, organizations can fully embrace the cloud while meeting strict compliance regulations for data location. This article gives administrators a primer on the setup and pitfalls to avoid for Microsoft Multi-Geo.
A Brief History
Before the introduction of Microsoft 365 Multi-Geo, multinational companies around the world who have offices residing in countries with data residency laws were forced to keep SharePoint and Exchange servers on-premises for sensitive data while using the core functions of Office 365 for data that is not sensitive. This is because some countries specifically state that certain data must stay within the country, such as the Personally Controlled Health Records Act of 2012 in Australia, which ensures that all personal medical information is stored locally. France and Germany have strict data residency laws, meaning all data produced by local and national public administrations must be stored within the country’s borders. Germany advocates the idea of national clouds so that all accounting data is held within the country. Microsoft previously had the dedicated Black Forest region, which was used exclusively for German tenants, this was closed in favor of a more regular Office 365 data center.
With Microsoft 365 Multi-Geo, companies can move some of the core Office 365 to different data centers, which allow companies to meet data residency requirements with multi-Office 365 locations within their tenant around the world. Since its release, the following services are enabled for Microsoft 365 Multi-Geo:
- Exchange Online
- SharePoint
- Teams
- OneDrive for Business
Microsoft 365 Multi-Geo Terminology
It should be noted that there is certain terminology used when discussing Microsoft 365, this list includes the following:
- Central location – The location of your tenant.
- Geo code – the three-letter code for geolocation such as APC, EUR, or JPN.
- Geolocation – A location that can be used in a multi-geo tenant to host data, including Exchange mailboxes, Teams, OneDrive, and SharePoint sites.
- Preferred Data Location (PDL) – The user property that is set by the admin that determines where the user’s data resides. The PDL can also determine the data location for a SharePoint site.
- Satellite location – The geolocation where M365 workloads are enabled in a Multi-Geo enabled tenant.
- Geo administrator – The role given to an administrator who can migrate users or SharePoint data from one Geolocation to another.
Microsoft 365 Multi-Geo Locations
The locations that are enabled for M365 Multi-Geo can be found here: https://docs.microsoft.com/en-us/microsoft-365/enterprise/microsoft-365-multi-geo?view=o365-worldwide#microsoft-365-multi-geo-availability
Microsoft 365 Multi-Geo Requirements
To be able to purchase Microsoft 365 Multi-Geo licenses, the following requirements need to be met:
- A Minimum of 250 Microsoft 365 seats in the tenant with at least 5% of those seats using multi-geo.
- The following licenses are also needed alongside the Microsoft 365 Multi-Geo Licenses
- Microsoft 365 F1, F3, E3, or E5
- Office 365 F3, E1, E3, or E5
- Exchange Online Plan 1 or Plan 2
- OneDrive for Business Plan 1 or Plan 2
- SharePoint Online Plan 1 or Plan 2
- If users are synchronized from On-Prem AD, the Active Directory schema should be uplifted to 2019. To find out your schema version, please use the following PowerShell command:
Get-ItemProperty 'AD:\CN=Schema,CN=Configuration,DC=contoso,DC=local' -Name objectVersion
Microsoft 365 Multi-Geo Migration Steps
It is recommended that to migrate users to other PDLs, the following steps should be taken in order:
- Acquire Correct Licensing
- Create Satellite Locations
- Set User’s PDL
- Migrate User’s OneDrive
- Migrate SharePoint sites
Cybersecurity Risk Management for Active Directory
Discover how to prevent and recover from AD attacks through these Cybersecurity Risk Management Solutions.
Acquire Correct Licensing
The first step is to ensure that the correct licensing has been purchased and assigned to the users who will be using M365 Multi-Geo. This will then enable the Geo Locations tab in the SharePoint Online Admin Center.
Create Satellite Locations
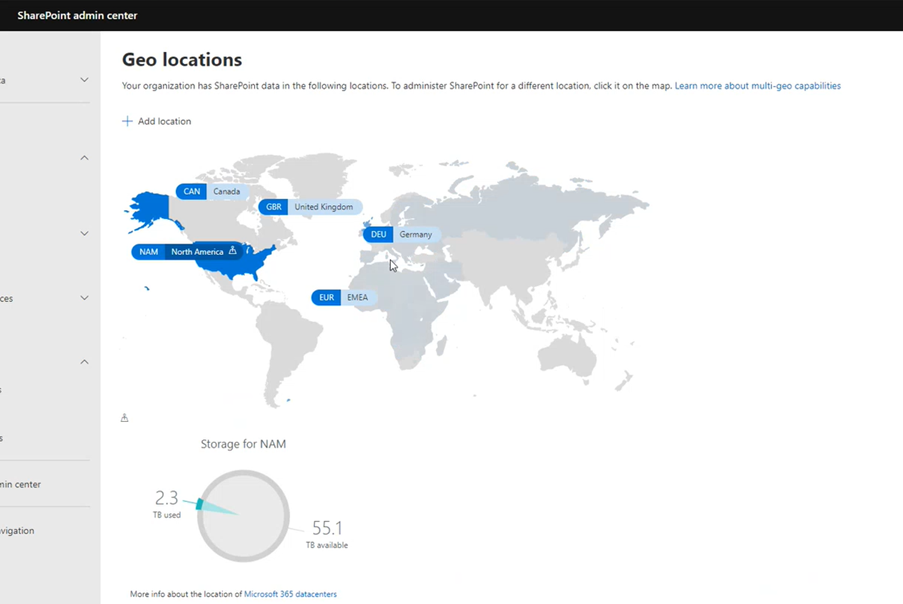
After assigning the correct licensing, to create a Satellite Location, you will need to navigate to SharePoint Online Admin Center, Advanced then Geo Locations, here you will see a map with your Central Location and Satellite Locations highlighted. It should be noted that even if you have no SharePoint sites that need migrating, the Satellite locations must be created here (Figure 1):

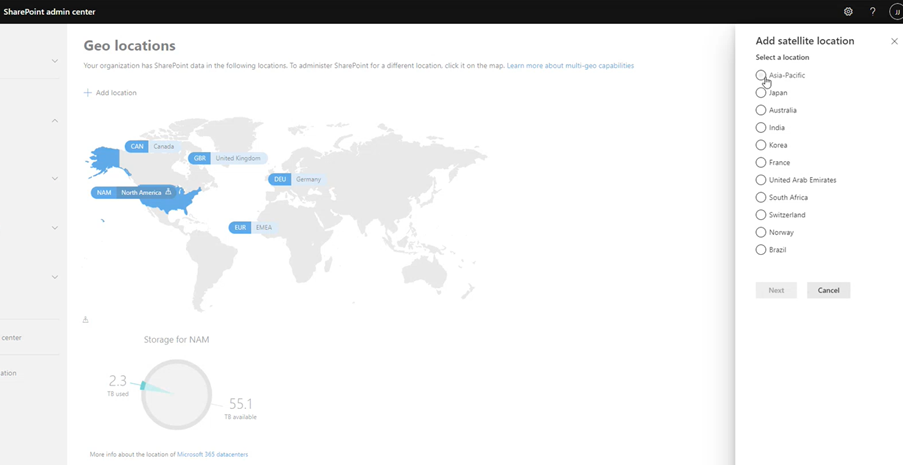
In Figure 1, we have one Central Location (North America) and 4 Satellite locations (Canada, United Kingdom, Germany, and EMEA). To add a new Satellite Location, click on Add Location which brings up a new side menu (Figure 2):

Clicking a location and then pressing next will create a new location within 72 hours.
Setting a User’s PDL
There are two ways to set a user’s PDL and they depend on the source anchor of the user’s account. If the user account source anchor is an on-premises Active Directory and if the Active Directory schema has been uplifted to 2019, the PreferredDataLocation attribute must be updated with the three-letter Geo-Code. This can be done using ADSI Edit or the following PowerShell command:
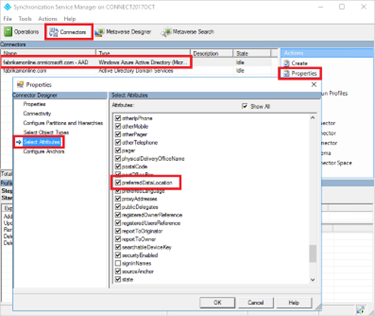
Azure AD Connect must also be updated to include the PreferredDataLocation attribute. Do this by adding the attribute to the Azure AD connector in Azure AD Connect (Figure 3):

If the user account is homed in Azure AD, the following PowerShell can be run, it should be noted that the PreferredDataLocation cannot be updated in MS Graph API at the time of writing this article:
Connect-MsolOnline
Set-MsolUser -UserPrincipalName <UserPrincipalName> -PreferredDataLocation <GeoLocationCode>
It is worth noting that when a user’s PDL is populated, it automatically queues the migration of the user’s Exchange mailbox to the PDL. If the user account is created with a PDL populated, the Exchange mailbox is created in the PDL location. To create a user with a PDL already assigned, you will need to assign the PDL to the user before an Exchange license has been assigned to it. This can be done by populating the Geocode in the PreferredDataLocation field in Active Directory or via this command line using Azure Active Directory PowerShell:
Connect-MsolOnline
Set-MsolUser -UserPrincipalName <UserPrincipalName> -PreferredDataLocation <GeoLocationCode>
Working with SharePoint
When a new Satellite location is created, a brand-new SharePoint namespace is created, for example, if a Satellite location was created in the United Kingdom, the previous SharePoint URL of https://contoso.sharepoint.com will be appended with GBR, so it will change to https://contosogbr.sharepoint.com this is also the case for the admin center. This means policies for unmanaged devices and restricting SharePoint site content can be changed per site.
Migrating SharePoint Sites
Unlike Exchange Online where mailboxes are migrated automatically when a user’s PDL is set, SharePoint Sites need to be migrated manually. There are two ways to migrate SharePoint data from one Satellite location to another, depending on if the SharePoint site is group-enabled. If the site is group-enabled, see the Teams section below, for sites that are not group-enabled, the script below should be run. In this scenario, we are migrating the Turbines site from the Central Location to the GBR satellite location:
Connect-SPOService -URL https://contosohealthcare-admin.sharepoint.com
Start-SPOSiteContentMove -SourceSiteUrl https://contosohealthcare-admin.sharepoint.com/sites/Turbines -DestinationDataLocation GBR
The cmdlet responds to confirm that the migration has started (Figure 4):

SharePoint site migrations can be done in bulk by creating a .CSV with two headings SourceSiteUrl and DestinationDataLocation, for example (Figure 5):

Then use the following script:
#This script is to update the PDL of a SharePoint site that has no Microsoft 365 Group attached to it
Connect-SPOService -URL https://contosohealthcare-admin.sharepoint.com
Import-CSV SharePointPDL.csv | ForEach {Start-SPOSiteContentMove -SourceSiteUrl $_.SourceSiteUrl -ValidationOnly -DestinationDataLocation $_.DestinationDataLocation}
Microsoft Teams
The following data in Teams is Multi-Geo aware:
- User Chat:
- One to One – A conversation with one person will be hosted in the location of the PDL who initiated the chat.
- One to Many – A group conversation will be hosted in the location of the PDL of the person who created the chat
- Private Meeting – Scheduled Meetings in Teams where the chat function has been used. The storage data for meeting chat is based on the PDL of the person who organized the meeting.
It should be noted that if the PDL of the user’s chat data is changed, the chat data will be migrated automatically to the new Geo-Location.
But with Channel messages, both Public and Private channel data is hosted in the PDL of the Microsoft 365 Group.
To set the PDL of a Microsoft 365 group and migrate the SharePoint site owned by the group, the following PowerShell should be run:
Connect-SPOService -URL https://contosohealthcare-admin.sharepoint.com
Set-SPOUnifiedGroup -PreferredDataLocation <PDL> -GroupAlias <GroupAlias>
Get-SPOUnifiedGroup -GroupAlias <GroupAlias>
Start-SPOUnifiedGroupMove -GroupAlias <GroupAlias> -DestinationDataLocation <DestinationDataLocation>
To migrate a Microsoft 365 Group in bulk, the following can be used after creating a .csv with the two headers PreferredDataLocation and GroupAlias:
Connect-SPOService -URL https://contosohealthcare-admin.sharepoint.com
Import-CSV TeamSitePDL.csv | ForEach {Set-SPOUnifiedGroup -PreferredDataLocation $_.PreferredDatalocation -GroupAlias $_.GroupAlias}
Import-CSV TeamSitePDL.csv | ForEach {Get-SPOUnifiedGroup -GroupAlias $_.GroupAlias}
Import-CSV TeamSitePDL.csv | ForEach {Start-SPOUnifiedGroupMove -GroupAlias $_.GroupAlias -DestinationDataLocation $_.PreferredDatalocation}
To view the Geo Location of a Microsoft 365 group, the following should be run:
Get-MultiGeoRegion -EntityType Group -EntityId <GroupObjectId>
Conclusion
Once the licensing has been purchased, setting up Microsoft 365 Multi-Geo is straightforward. If your organization has data residency issues, get enrolled with Microsoft 365 Multi-Geo as soon as possible.


When a Geo-Located user leaves the company, does the Geo license automatically get returned to the “shelf” for use on another user needing Geo-location ?
When a Geo-Located user leaves the company, the the Geo license automatically returned to the “shelf” for use on another user needing Geo-location ?
Hi Thinesh,
the MailboxRegion attribute is part of the mailbox and visible with Get-Mailbox
Get-Mailbox -Identity | Format-List Database,MailboxRegion*
Is there any powershell comments or graph api to get preferred data location of shared mailbox