In 2013, Paul Cunningham wrote about outbound mail flow in Exchange 2013. Time goes by, and new versions of Exchange Server mean that it’s good to review the current position up to and including Exchange 2019.
In this article, I discuss outbound mail flow in Exchange 2019 and using a smart host to send email from Exchange 2019.
Outbound Mail Flow
In previous articles, I discuss Transport services in Exchange 2019 and how to configure Receive Connectors for SMTP relay purposes. But an Exchange 2019 server also needs to send outbound messages, and Exchange 2019 uses send connectors for this purpose.
Out of the box, a freshly installed Exchange 2019 server in a greenfield scenario comes with five default receive connectors, but has no send connectors. To send outbound email, you must create a send connector.
Exchange 2019 has two ways to send outbound email:
- Direct delivery – The Exchange 2019 server is responsible for delivering emails direct to the mail server of the intended recipient.
- Smart host – The Exchange 2019 server sends emails to another mail server or mail service that is responsible for transmitting the emails for final delivery to the mail server of the intended recipient.
I will discuss these options in more depth in the next sections.
Microsoft Platform Migration Planning and Consolidation
Minimize the risk, time, cost, and complexity associated with your next Exchange Online Domain Transfer
Direct Delivery
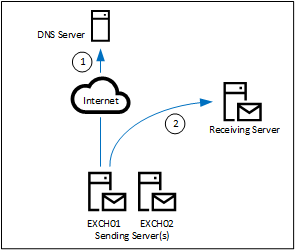
With direct delivery, an Exchange 2019 sends emails direct to the mail server of the recipient. It does this by checking the MX record of the recipient domain in DNS (1), after which it connects to the mail server indicated in this MX record (2) to deliver the message (Figure 1).
Creating a new send connector is not difficult. Here’s an example of creating a new send connector using the Exchange management shell:
New-SendConnector -Name "To Internet" -Usage Internet -AddressSpaces * -SourceTransportServer EXCH01,EXCH02

Identity    AddressSpaces Enabled
--------    ------------- -------
To Internet {smtp:*;1}    True
When reviewing the New-SendConnector command, the following parameters are used:
- Name. Does not need further explanation.
- Usage. This is the usage type of the send connector. A usage type is a descriptive label that identifies the intended use of the send connector. Exchange 2019 supports the following usage types:
- Internal. This type is typically used for sending messages between internal messaging environments and does not have any message size limits. By default, you cannot configure the internal send connector using MX to send messages when creating the connector, but you can change it afterward.
- Internet. This type is typically used for sending messages to the internet. The message size limit for this type of connector is 35MB. The Internet send connector can be configured using MX or using a smart host.
- Partner. This type is typically used to create a connector to exchange email with a partner organization. The Send Connector is secured using TLS for a specific domain. By default, this type of connector is configured with MX lookup, but it can be changed once configured. After creation, it must be configured with the correct certificate settings. A partner send connector is configured with a 35MB size limit. Partner connectors are used between law firms or financial organizations, where a secured and encrypted mail connection must be used.
- Custom. This type of send connector is typically used to send messages to non-Microsoft mail platforms.
- AddressSpaces. The namespaces or domains that this connector can send mail to. In this example, a wildcard is used. This means that messages for all domains can use this connector. Instead of a wildcard, it can also contain domain names, for example ‘contoso.com’. When domain names are specified, only messages for the specified domain can use the connector.
- SourceTransportServer. The Exchange 2019 servers that use this connector to send messages.
Note that it is possible to omit the -Usage parameter and only use the value. For example, -Internet or -Partner.
It is also possible to create a send connector in the Exchange Admin Center. Navigate to Mail flow à Send Connectors and click the + icon to start the new send connector wizard. Give the send connector a meaningful name and select its usage type, as shown in Figure 2.
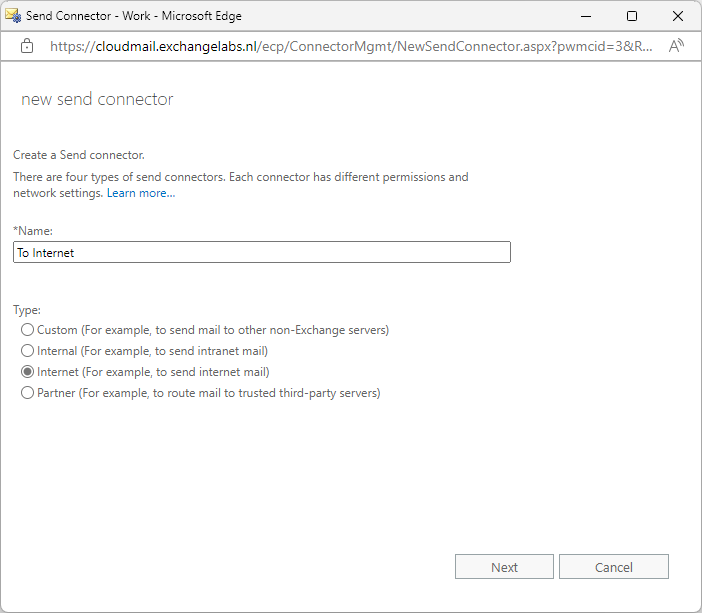
Click Next, leave the radio button default at MX record associated with recipient domain, and click Next again. In the Address Space window, add * for delivery to all domains and click Next. In the Source Server window, add the Exchange 2019 servers that will send out the SMTP messages and click Finish. The new connector is now ready to use.
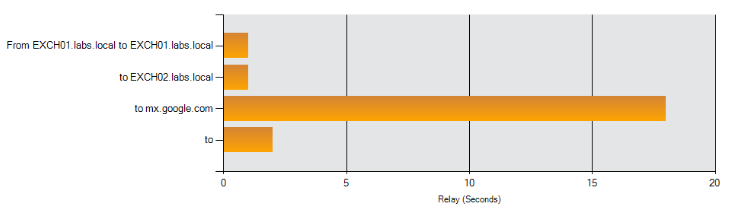
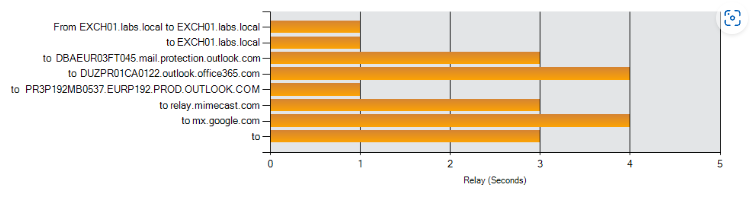
After a message has been sent over this new Send Connector, use a message header analyzer like mxtoolbox.com to check the mail flow, as shown in Figure 3.
Smarthost Delivery
If you do not want to or are not allowed to connect Exchange 2019 directly to the Internet, you can use a smarthost for sending outbound email. When a smart host is used, the email is not delivered directly by Exchange 2019. Instead, final delivery is handled by another mail server. This can be a mail server or an appliance like a Cisco IronPort in your own environment. It can also be a mail server hosted by a provider, or a cloud solution like Exchange Online Protection, MimeCast Email Security, or Cisco Cloud Email Security (CES).
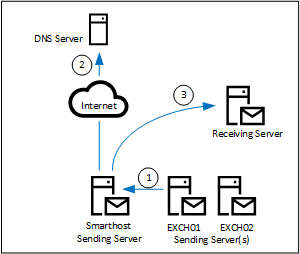
When using an internal mail server as a smarthost, the Exchange 2019 server forwards a message to the smarthost (1), the smarthost does an MX record lookup (2) and delivers the message to the recipient mail server (3). This is shown in Figure 4.
To create a new send connector that uses an internal SMTP server as a smarthost, use the following PowerShell command:
New-SendConnector -Name "Smarthost To Internet" -Usage Internet -DNSRoutingEnabled $False -SmartHosts 10.83.4.199 -AddressSpaces * -SourceTransportServer EXCH01,EXCH02

Identity              AddressSpaces Enabled
--------              ------------- -------
Smarthost To Internet {smtp:*;1}    True
The DNSRoutingEnabled parameter is set to $False, which turns off the MX delivery and turns on the smarthost delivery. The SmartHosts parameter defines the mail servers that are responsible for delivering the messages to the intended recipients.
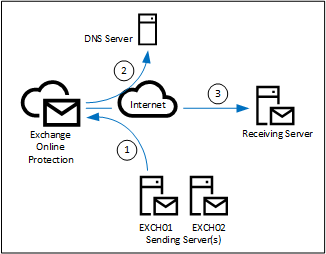
It is also possible to use Exchange Online Protection as a smarthost. In this scenario, Exchange 2019 forwards the message to Exchange Online Protection (1). Exchange Online Protection does the MX record lookup (2) and delivers the message to the recipient mail server (3). This is shown in Figure 5.
This scenario is a bit more complex to configure than just adding a smarthost. To use this method (and basically enable SMTP relay through Exchange Online Protection), the sending server must be validated using a third-party certificate. To configure a connector using this method, use a PowerShell command like the following:
New-SendConnector -Name "EOP Smarthost" -Usage Internet -AddressSpaces * -CloudServicesMailEnabled $true -RequireTLS $true -DNSRoutingEnabled $false -SmartHosts exchangelabs-nl.mail.protection.outlook.com -TlsAuthLevel CertificateValidation -fqdn "webmail.exchangelabs.nl" -SourceTransportServers EXCH01,EXCH02

Identity      AddressSpaces Enabled
--------      ------------- -------
EOP Smarthost {smtp:*;1}    True
Note that both Exchange 2019 servers defined by the command are configured with a 3rd party certificate with “CN=webmail.exchangelabs.nl” which is bound to IIS and SMTP.
When sending an email from an internal Exchange 2019 mailbox to a Gmail mailbox and checking the message headers, you can find something as shown in Figure 6.
Summary
Exchange 2019 uses send connectors to send outbound messages. A send connector can send messages directly to the Internet. This works fine, but you must configure everything yourself.
Another option is to use a smarthost. In this scenario, Exchange 2019 sends the messages to the smarthost, and the smarthost delivers the messages to the intended recipients. When the smarthost is an internal server, you must configure everything yourself. When the smarthost is a service running in the cloud, you only forward the messages to the cloud provider, and they take care of everything else.