So far in this series on account breaches, we’ve discussed using Cloud App Security in Office 365 for detecting account compromises in your environment. We then reviewed what to investigate in Cloud App Security. And more recently, we went over the more cost-effective option for those who don’t have access to Cloud App security, where I demonstrated how to use the Hawk PowerShell Module. In the fourth and final part of this series, we’ll be discussing how to remediate an Office 365 account breach.
Remediation Actions
To get started, let’s take a look at the essential remediation checklist for Office 365 account breaches, then we can walk through the commands to perform in this type of breach. In our previous articles, we received a Cloud App Security alert on Impossible Travel activity and a Suspicious Inbox Manipulation rule. Below are the steps you should take to remediate the breaches, I also recommend using these for building a Security Playbook that can be shared for remediating account breaches in the future.
The Essential Office 365 Account Breach Remediation Checklist:
- Reset the Users Password in Active Directory or Office 365 if the account is a cloud-only account
- Enable Multi-Factor Authentication (MFA) on the account in question
- Apply the Require user to sign in again via Cloud App Security (if available)
- Force User Sign-out from Microsoft 365 Admin Panel
- Review the mailbox for any mailbox delegates and remove from the compromised account
- Review the mailbox for any mail forwarding rules the attacker may have created
- Review the mailbox inbox rules created by the attacker and delete them.
- Block the IP address the attacker used to sign-in with using the set-organizationconfig -iplistblocked commands
- Educate the user about security threats and methods used to gain access to users’ credentials
Reset Users Password
The first step of remediation is to reset the user’s password. If your organization is set up with AD Connect you can proceed to reset the user’s password in Active Directory and this will be replicated to Office 365. If you have a cloud-only account or password writeback is enabled, then you can reset the user’s password in Microsoft 365 Admin portal.
- Go to the Microsoft 365 admin center and log in to your Admin account
- Click the Users option on the left pane and Click on Active Users
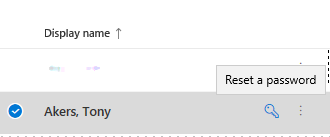
- In the Search windows type in the user in question and press Enter
- Highlight over the blue key beside the name and select Reset a password
- Either Select auto-generate or let me create the password. Fill in a password and Select the checkbox to Require this user to change their password when they first sign in
Enable Multi Factor Authentication
- Go to the Microsoft 365 admin center and log in to your Admin account
- Click the Users option on the left pane and click on Active Users
- In the Search windows type in the breached user, press Enter and click on the user name
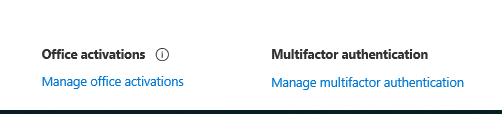
- In the bottom right of the user’s page click on Manage Multifactor Authentication
5. Click the Search Icon and look for the user
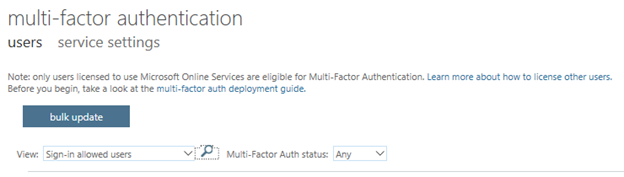
6. Click Enable under quick steps
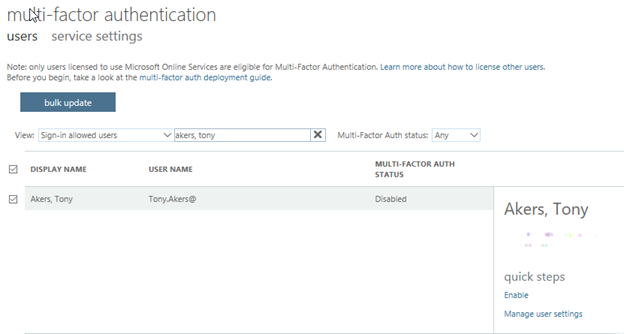
7. Click enable multi-factor auth and you will receive an updated successful message
Require user sign-in again with Cloud App Security
This step can be used for Admins that have licensed access to Cloud App Security.
- Go to https://protection.office.com and sign in with your Admin account
- Click the Alerts drop-down and select Manage Advanced Alerts
- Click Go to Office 365 Cloud App Security
- Locate the Impossible Travel Alert for the user who was compromised
- For the Logon alert click on the Users’ Name and select the drop-down for User Actions
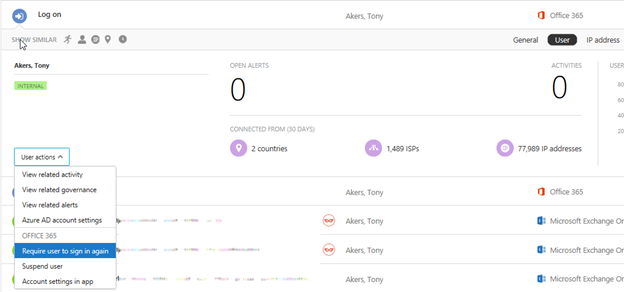
This will require all sign-ins from the user or the attacker who has the old password to sign in again. This action will revoke refresh tokens and session cookies. Since the password was changed and MFA enabled, the attacker will not be able to login.
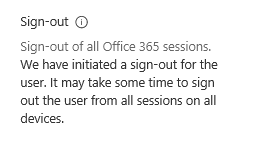
Force User Sign-out from Microsoft 365 Admin panel
If you’re not licensed for Cloud App Security, you can still force the user to sign out via the Microsoft 365 Admin Panel.
- Go to the Microsoft 365 admin center and log in to your Admin account
- Click the Users option on the left pane and click on Active Users
- In the Search windows type in the user in question and press Enter and click on the user name
- Select the OneDrive tab and locate Sign-Out

5. Click on Initiate sign-out
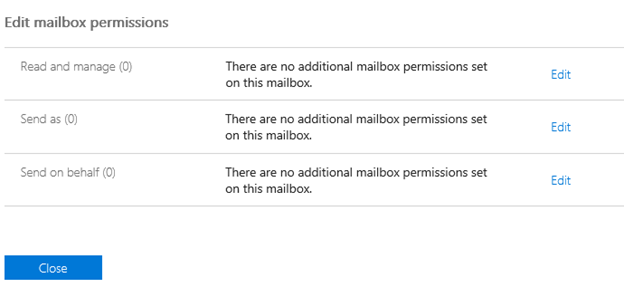
Remove Email Forwarding and Mailbox Delegates
- Go to the Microsoft 365 admin center and log in to your Admin account
- Click the Users option on the left pane and click on Active Users
- In the Search windows type in the user in question and press Enter and click on the user name
- Select the Mail tab and review if any Email Forwarding settings are in place

If you have an invalid SMTP address in Email Forwarding, select Manage Email Forwarding and remove as necessary.
5. To remove Delegates on the mail tab Select Manage Mailbox Permissions
6. Edit as necessary however it is recommended to remove delegates at this time since the account was confirmed compromised
Review and Delete Malicious Inbox Rules
In this scenario, we received a Cloud App Security Alert for Suspicious Inbox Manipulation Rule for user Tony Akers with a new inbox rule titled “Wire Transfer”. We will need to check this rule and remove.
- Login into Exchange Online with PowerShell by following our sign in document
- To check existing inbox rules, execute the following PowerShell command:
- “Get-inboxrule -mailbox user@domain.local”

2. Type Get-inboxrule “Wire Transfer” -mailbox user@domain.local | fl

- This rule is moving Emails with Subject “Wire Transfer” to the folder “RSS Subscriptions”
- To delete this rule, execute “Remove-Inboxrule -mailbox user@domain.local -identity “Wire Transfer” and type Y at the prompt

This process has now removed the malicious inbox rule that was created by the attacker.
Block IP address in your Office 365 tenant
Either using the Cloud App Security Logon Alerts or using the Hawk PowerShell Module, you’ll have found the IP address that the attacker used to log in to the tenant. We need to ensure these attackers are not permitted to login again. The below method blocks all future logon attempts at the tenant level by using the set-organizationconfig -iplistblocked command.
- Identify the IP address used during the attack. In this example, we’ll use 193.0.218.27
- Whilst your still in the same PowerShell module session, execute the below to add this IP address to the block list
- Set-OrganizationConfig -IPListBlocked @{add=”193.0.218.27″}
- You have now added this IP to the block list which will prevent this IP from connecting to Exchange Online in the future.
Educate the User
Education will be the final step to discuss with the user on how they were compromised. In most cases it’s because of a phishing email and the user clicking on a malicious link and typing in their credentials, you can find out more about this in my blog here. Explain to them the various methods of attacks and provide the user training and documentation to prevent the incidents from happening in the future.
Conclusion
I hope you have found this series helpful establishing a method of investigating and remediating compromised accounts in Office 365. We’ve covered how to detect account breaches utilising the Cloud App Security Module in part one. Then, in part two, we looked at how to investigate the breaches using Cloud App Security. Thirdly, we explored using the Hawk PowerShell module for investigation for those who don’t have access to Cloud App security. Then in this article, I’ve provided guidance on how to remediate your account breaches.


Great Article. Thanks
Very good post, just some tips more:
– if you set the Cloud app security policy to disable your user, you don’t need to logoff from every device because the “disable” command automatically logs out the user from every dev.
– if you set your tenant to block the forwarding to external recipients, you don’t have to worry about the forward
– if you set previously the “bad outbond sender” limit, the user will be blocked before the 500 messages sent, otherwise he will be able to shitstorm the entire address book.
– if you need to recall the sent messages of the user, you can do it from the https://protection.office.com/threatexplorer preventing collegues to fall in the domino
– if the attacker is using always the same form, consider to pickup the SCL with an EAC rule to the mail flow filtering by subject or body or sender, in order to reduce the risk of a phishing sent from a stolen account
Enjoy!
BR
Mattia
From a compromised o365 e-mailaccount, how can we remove the SPAM e-mails from the queue?
You are welcome and thanks for reading our content!
Thanks so much for your quick response! It’s exactly what I needed
Sure, you can use the following after logging into the Exchange IOnline Powershell Module
Get-OrganizationConfig | select IPListBlocked | Export-Clixml c:\temp\iplist.xml
Article is great and has helped me be more efficient at my job. Is there a PowerShell command to view the IPs that where blacklisted using that script?