When you deploy an Office Online Server and integrate it with Exchange 2016, your Outlook on the web users can preview file attachments that are Word documents, Excel spreadsheets, or PowerPoint presentations.
There’s some convenience to be had by allowing users to view documents in a web browser, without having to download the file and open it in a locally installed Office application. In fact, this allows users to read Office documents without needing any Office applications installed at all, which is great for situations such as a shared computer on a warehouse floor, where staff mostly interact with web-based systems such as their inventory or ordering systems, and occasionally need to read a document while accessing their email using Outlook on the web.
Even though Office Online Server might seem like a service that is going to only intermittently utilized, that doesn’t mean you can just throw it onto a low end server or bundle it together with a bunch of other applications on a server.
You should adhere to the recommendations for deploying Office Online Server, which are:
- Follow the server sizing guidance for SharePoint Server 2016.
- Don’t install with any other server applications, particularly not any applications that use IIS or that will conflict with ports 80, 443, and 809. Port 809 is used for private traffic between Office Online servers if you’re running a multi-server farm.
- Don’t install the Office applications on the server.
- Don’t try to run Office Online Server on a domain controller.
You can virtualize Office Online Server though, that’s fine. In this demonstration I used a VM with a single vCPU and 4GB of memory, hosted on SSD storage, and it performed quite poorly. So don’t try and under-size your production Office Online Server deployments.
Installing Office Online Server Pre-Requisites
To prepare the Windows Server 2012 R2 server for Office Online Server installation, open a PowerShell console as administrator and run the following command.
Add-WindowsFeature Web-Server,Web-Mgmt-Tools,Web-Mgmt-Console,Web-WebServer,Web-Common-Http,Web-Default-Doc,Web-Static-Content,Web-Performance,Web-Stat-Compression,Web-Dyn-Compression,Web-Security,Web-Filtering,Web-Windows-Auth,Web-App-Dev,Web-Net-Ext45,Web-Asp-Net45,Web-ISAPI-Ext,Web-ISAPI-Filter,Web-Includes,InkandHandwritingServices,NET-Framework-Features,NET-Framework-Core,NET-HTTP-Activation,NET-Non-HTTP-Activ,NET-WCF-HTTP-Activation45,Windows-Identity-Foundation
After restarting the server, download and install the following components:
- .NET Framework 4.5.2
- Visual C++ Redistributable for Visual Studio 2015
- Microsoft.IdentityModel.Extention.dll
Installing Office Online Server
Download the Office Online Server installation media from your licensing portal and mount the ISO on the server. Run Setup to begin the installation of Office Online Server. There is very little required to get Office Online Server installed. There is a license agreement to accept, followed by choosing an install path (I just use the default path), and then the software will install itself.
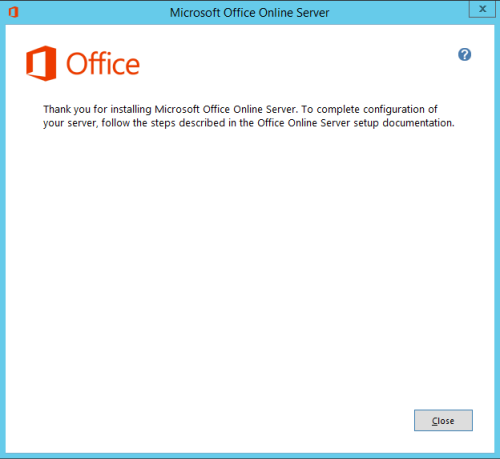
After Office Online Server has finished installing you should also install the OOS Language Packs.
Configuring Office Online Server
In a curious move by Microsoft, Office Online Server has no configuration GUI or console. Instead, the entire configuration must be performed using PowerShell. Using PowerShell to configure servers is not all that unusual in itself, but even the most PowerShell heavy products from Microsoft usually have at least an initial setup wizard.
There are three ways to configure Office Online Server. Note that every Office Online Server deployment is a “farm”, whether it has a single server or multiple servers.
- Single server farm using HTTP – I don’t recommend this for production, on the basis that we shouldn’t be using non-HTTPS services (even internally), and also because this type of deployment is not able to be used for PowerPoint broadcasts with Skype for Business. However, it can be used with SharePoint 2016 and Exchange 2016.
- Single server farm using HTTPS – this will work with SharePoint 2016, Exchange 2016, and Skype for Business Server 2015.
- Multiple server farm using HTTPS – same as above, but involves a load balancer and multiple servers. Adding more servers to the Office Online Server farm isn’t difficult though, so you can start with a single server farm initially if you are just doing testing, and scale out later.
Configuring an SSL Certificate for Office Online Server
I’ll be deploying a single server farm using HTTPS. Which means that an SSL certificate will be required. The SSL certificate request can be generated using IIS manager on the OOS server.
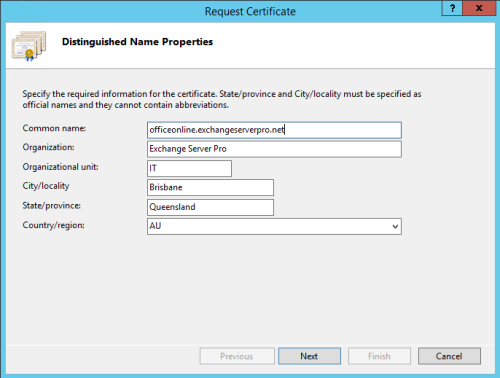
If your Office Online Server will be accessible using different internal and external URLs, include both names on the certificate when you request it from the certificate authority.
When you complete the certificate request, make a note of the friendly name that you choose, as you’ll be using the name again soon when configuring the OOS farm.

You do not need to bind the SSL certificate to any IIS websites at this stage.
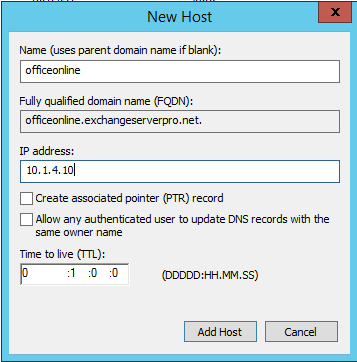
Configuring DNS for Office Online Server
The URL that will be used to access Office Online Server needs to be added to your DNS zones (internal and external, if you’re expecting to access it from both). For a single server, add a DNS record that points to the IP address of the server. If you’re load balancing, point the DNS record at the load balancer’s VIP.
Create the Office Online Server Farm
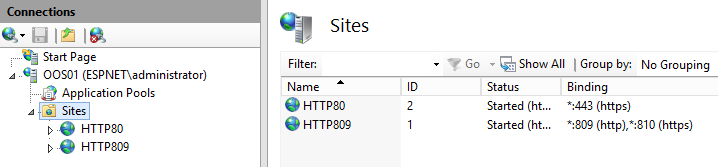
To create the farm, run the New-OfficeWebAppsFarm cmdlet using PowerShell on the Office Online Server that you’ve installed.
PS C:\> New-OfficeWebAppsFarm -InternalURL "https://officeonline.exchangeserverpro.net" -ExternalURL "https://officeonline.exchangeserverpro.net" -CertificateName "Office Online Server" -EditingEnabled
After configuration has completed you will see that the default website in IIS has been replaced with websites for Office Online Server.
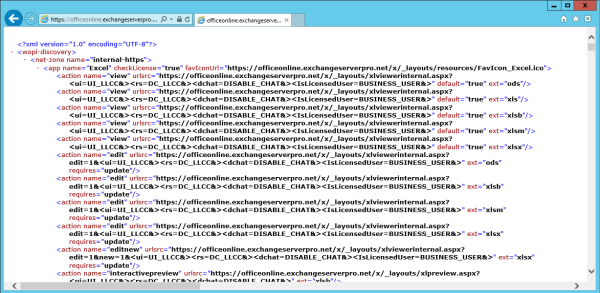
Use a web browser to connect to the Office Online Server internal URL and the path /hosting/discovery, for example https://officeonline.exchangeserverpro.net/hosting/discovery. You should see a bunch of XML output.
Configuring Office Online Server Integration with Exchange 2016
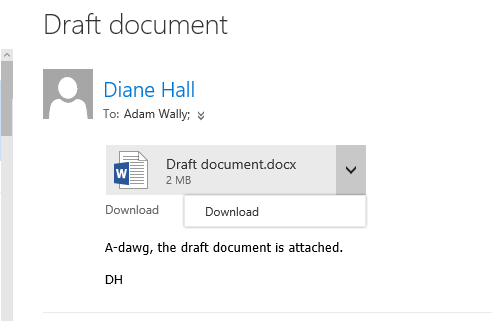
Before I configure Office Online Server to work with Exchange 2016, let’s just take a quick look at the email attachment experience for Outlook on the web users right now. As you can see below, a file attachment only has the option to download, and can’t be viewed in the browser.
There’s also a few caveats to be aware of when configuring the Office Online Server integration. In Exchange 2016 there’s two places that the OOS URL can be configured:
- At the organization level
- At the mailbox server level
In an Exchange 2016-only environment, the mailbox level configuration takes precedence. A mailbox server will use the URL configured on the server for any mailbox users currently active on that server. This allows you to use different Office Online Server URLs for different geographic regions.
If the mailbox-level URL is unreachable, it will fallback to the organization-level URL. For some environments that fallback behavior will be useful.
However, if there are Exchange 2013 servers in the environment as well, you should not configure the Office Online Server URL at the organization level. Doing so will cause the Exchange 2013 servers to try and use the new Office Online Server URL, which is not supported.
In my demo environment there are Exchange 2013 servers present, so I’ll be configuring the Office Online Server URL at the mailbox level.
[PS] C:\>Set-MailboxServer EX2016SRV1 -WacDiscoveryEndpoint "https://officeonline.exchangeserverpro.net/hosting/discovery"

[PS] C:\>Set-MailboxServer EX2016SRV2 -WacDiscoveryEndpoint "https://officeonline.exchangeserverpro.net/hosting/discovery"

[PS] C:\>Invoke-Command -ComputerName EX2016SRV1,EX2016SRV2 {Restart-WebAppPool MsExchangeOwaAppPool}
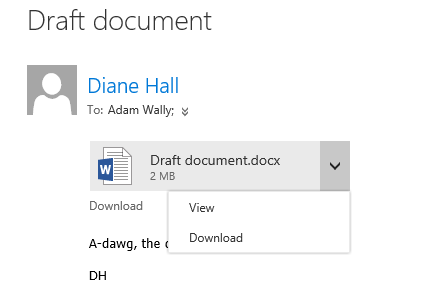
Refresh the Outlook on the web session and check the options available for Office file attachments. A “View” option should now be available.
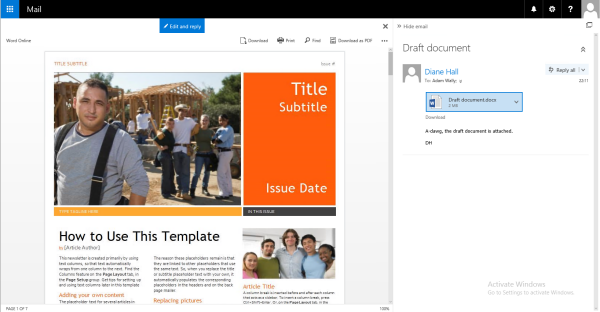
The document will open in the web browser for viewing, and you can edit the document and send it as a reply or to another email recipient as an attachment, without needing to save it locally first.
Summary
Office Online Server can provide a convenient Office document viewing and editing experience for your Outlook on the web users when you integrate it with Exchange 2016. Although the deployment of Office Online Server itself is not complicated, take care to size your servers appropriately so that your end users do not have a poor user experience.


Wish I had read this before I installed OOS on my new Exchange 2016 server…
IIS stuffed and can’t seem to find a way to back it all out…
In a whole world of pain now 🙁
Can two servers with different OOS build versions work on the same farm?
Thank you very much, your article helped me
Will OOS Nov 2018 work on Exchange 2019?
Hi,
I could install the oos server successfully after your excellent guide!
My Problem is: i work on the document and send it back. But the recipient get a doc without the changes i made? I have no idea, what goes wrong.
Any suggestions?
Thanks Paul. I was able to successfully configure Office Online Server and integrate with Ex 2016. I did purchase wildcard certificate and was able to use it for OOS.
Created the farm and used wildcard certificate. I read at MS site wildcard certificate is not supported for OOS but it does work, if you change the friendly name on the certificate and use the friendly name within PS.
Hi – I am building home lab to test OOS on server 2012. The OOS server name will be oos.infotechram.com.
Will open certlm.msc from OOS Server and select Personal – All Tasks – Create Custom Request – Web Server – Subject Name – Common Name – Value (oos.infotechram.com) and Alternative Name – DNS – Value (oos.infotechram.com). Save the certificate request to C drive and then approach SSL2BUY to obtain SAN certificate. Will give SSL2BUY the certificate request file that, I generated so SSL2BUY can provide SAN certificate that I will import into OOS server. Am, I doing the certificate steps correct????
My internal and external url will be oos.infotechram.com
Thanks
Ram
You can do it that way. In the blog post I use IIS to generate the certificate request.
Hey Guys,
If you are an enterprise with a local PKI it would be worth adding the the OOS FQDN to to SAN on the cert will assist with your SCOM reporting.
https://blogs.technet.microsoft.com/dodeitte/2014/01/12/how-to-get-office-web-apps-server-2013-to-report-a-healthy-health-status/
I’m new to this topic and my company runs an old outdated on-prem exchange version. I’m super interested in the documented editing features as mentioned here. I was reading another article ( http://www.msexchange.org/blogs/walther/news/webmail-or-ms-exchange-right-answer-your-small-business.html) and wonder if can get this feature with hosted exchange version as well ? Is there something like that ?
Excellent tutorial, as always, Paul. Thanks a lot for your contribution to the MS Exchange community.
Paul,
Are You also experiencing the following error in OfficeWebApps application logs in EventVwr?
https://social.technet.microsoft.com/Forums/office/en-US/298ff155-0407-4345-aa80-623b289df97e/uls-unhealthy?forum=OfficeOnlineServer
No, but I’ve heard of cases.