Every Exchange project should use the Exchange Server Role Requirements Calculator. The calculator helps us estimate the hardware requirements for new Exchange Server environments. All it needs is some input about your design requirements, along with the user messaging profiles.
Microsoft updates the Exchange Server Role Requirements Calculator regularly. Before you start designing a new environment, make sure to download the newest version available. You can see the changes in each version on the release notes page. At the time of this writing, the latest version is 9.1.

As you can see in the screenshot above, the calculator is an Excel spreadsheet with several tabs. You fill out the Input tab and the calculator does the rest for us.
The purpose of the calculator is to give us an accurate view of the hardware requirements of the Exchange Server design. But what many people don’t realize is that also provides us with deployment scripts. This is what I refer to as the secret magic of the calculator.
The Deployment Scripts
The deployment scripts generated by the Exchange Server Role Requirements Calculator provide us with several benefits:
- Speeds up the deployment of the Exchange servers and DAG
- Provides documentation of the steps taken during the DAG implementation
- Makes sure you don’t miss some of the vital configuration steps during DAG setup
- Makes for a reusable process if you work as a consultant in different environments
This is a great tool for you to take advantage of. The days of logging on to each server and manually making configuration changes are over. Instead, we should be scripting deployments so that we achieve predictable outcomes.
So, where do we find these deployment scripts? Well, they’re hiding out on the tab in the calculator named Distribution.

As you can see we have five buttons:
- Export DB Mount List – creates the Servers.csv file.
- Export DAG List – creates the DAGInfo.csv file.
- Export Primary DB List – Creates the MailboxDatabases.csv file.
- Export Copy DB List – Creates the MailboxDatabaseCopies.csv file.
- Export Role Calculator Scripts – Generates the PowerShell scripts for deploying the Exchange servers and DAG.
The first four buttons on the Distribution tab generate custom CSV formatted input files. We use these files together with the bundled deployment scripts. The custom CSV files are based the data you entered in the Input tab of the calculator. They also display a pop-up dialog for some extra information.
The last button, Export Role Calculator Script, creates the following script files:
- DiskPart.ps1 – uses the Servers.csv file for input. This script brings the data disks of the Exchange Server online, formats them, and mounts the volumes. The script will align with the recommendations of the Exchange Preferred Architecture for the volume mount points.
- CreateDAG.ps1 – uses the DAGinfo.csv file for input. This script creates the Database Availability Group and configures relevant settings such as the File Share Witness, and the number of database copies per volume.
- CreateMBDatabases.ps1 – uses the MailboxDatabases.csv file for input. This script creates the active databases, specifies the folder paths, and configures settings such as default mailbox quotas.
- CreateMBDatabaseCopies.ps1 – uses the MailboxDatabaseCopies.csv file for input. This script creates the mailbox database copies, and also configures any lagged database copies.
Providing Naming Information
Before generating the script input files, you should review and edit the Role Requirements Input Factors – Database Availability Group Configuration, found on the Input tab of the calculator. Here we define the server names, DAG name and mailbox database naming prefix.
In the example below, I’m using server names of JN-MBX-1 and JN-MBX-2. Don’t worry about changing all the server names in the list. The CSV file will only use of the same number of names as you set in the Number of Mailbox Servers Hosting Active Mailboxes / DAG field of the Input tab.
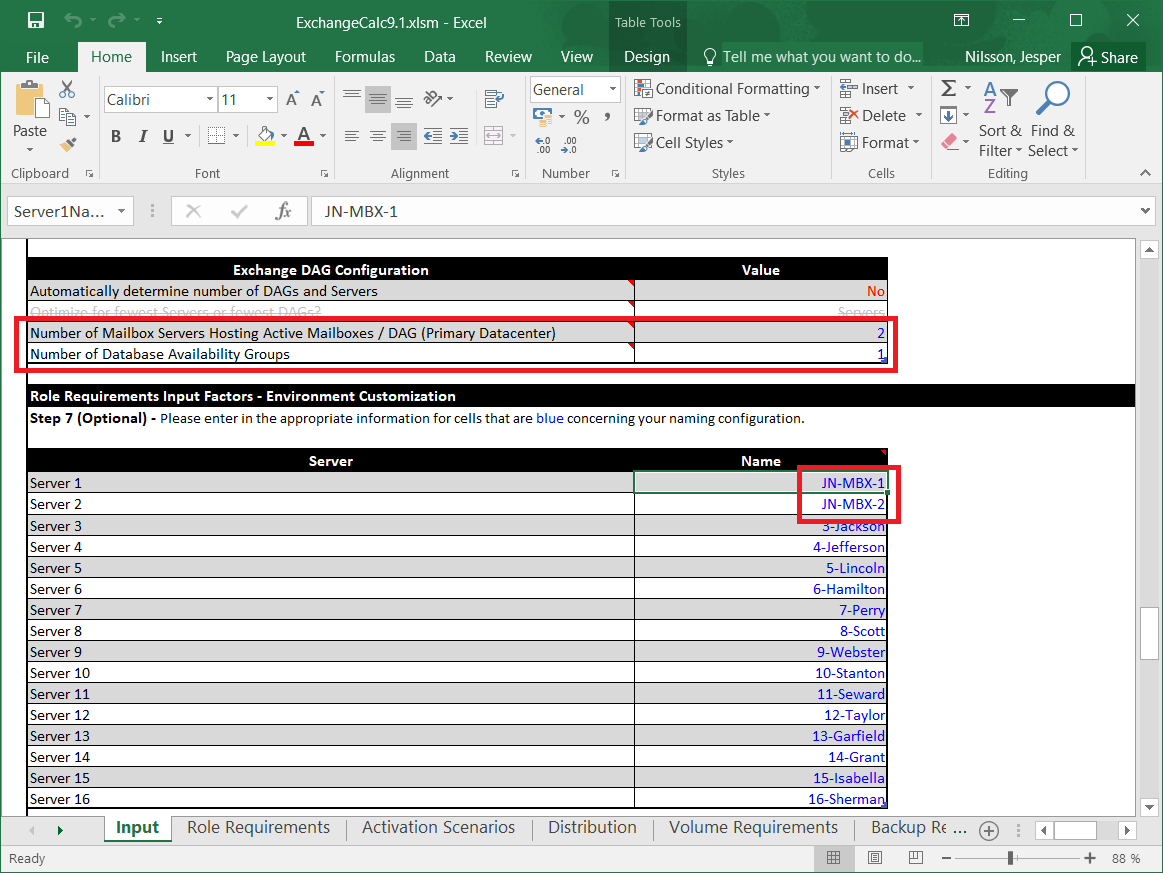
Additionally, I want my DAG to be named JN-DAG-1 and the prefix for my Databases set to JN-MDB.

Generating the Script Input Files
Now we can proceed with creating the CSV files to use as input for the deployment scripts. Start by clicking the Export DB Mount List button on the Distribution tab. The following dialog box will appear, prompting for information about where to save the CSV file. It will also ask you if you want to use a different volume/database root and file system format than the recommended values.
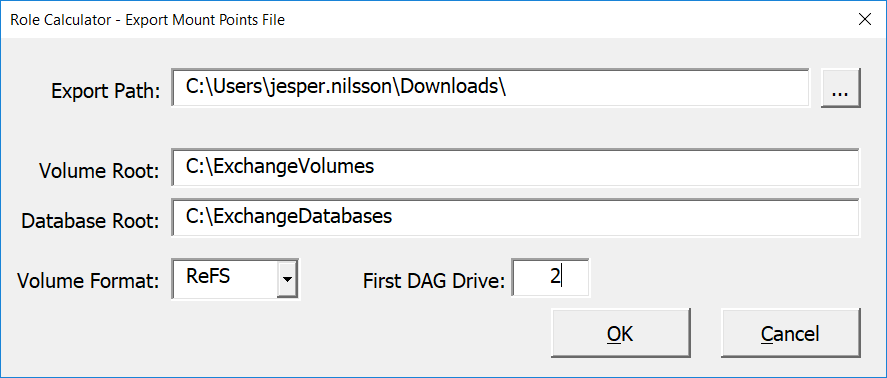
It’s very important to specify the correct First DAG Drive. This is the drive from where the scripts start to initiate actions such as formatting disks. You can retrieve the correct disk number by running Diskpart.exe from a command prompt on the server, and then the List Disk command.
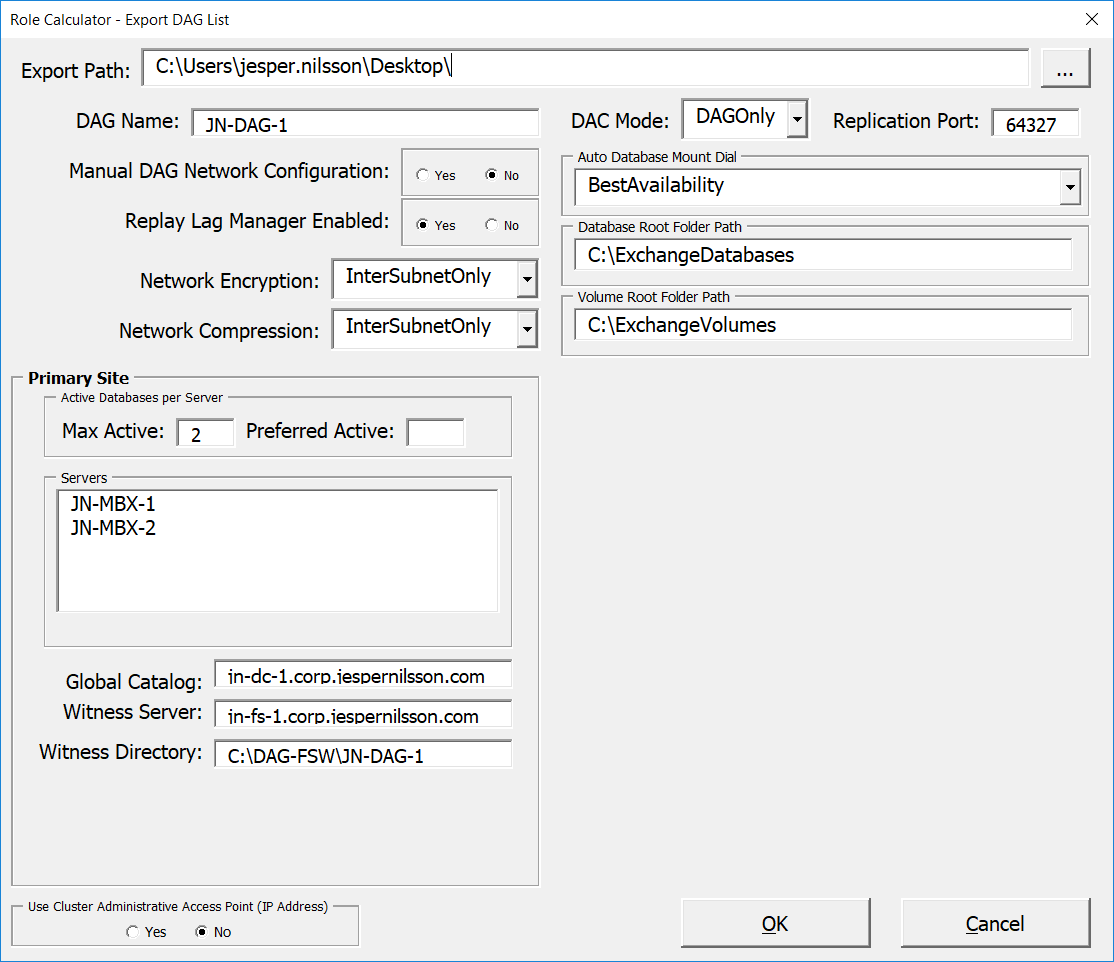
Next, click the Export DAG List button. This dialog box is a bit more detailed and requires information about your global catalogs and file share witness server. You’ll notice there are also a series of configuration choices for the DAG itself. Ideally you have already made those design decisions before you get to this stage of your project. If not, you can use the defaults provided, but I do recommend you research each of them so that you understand what they mean.
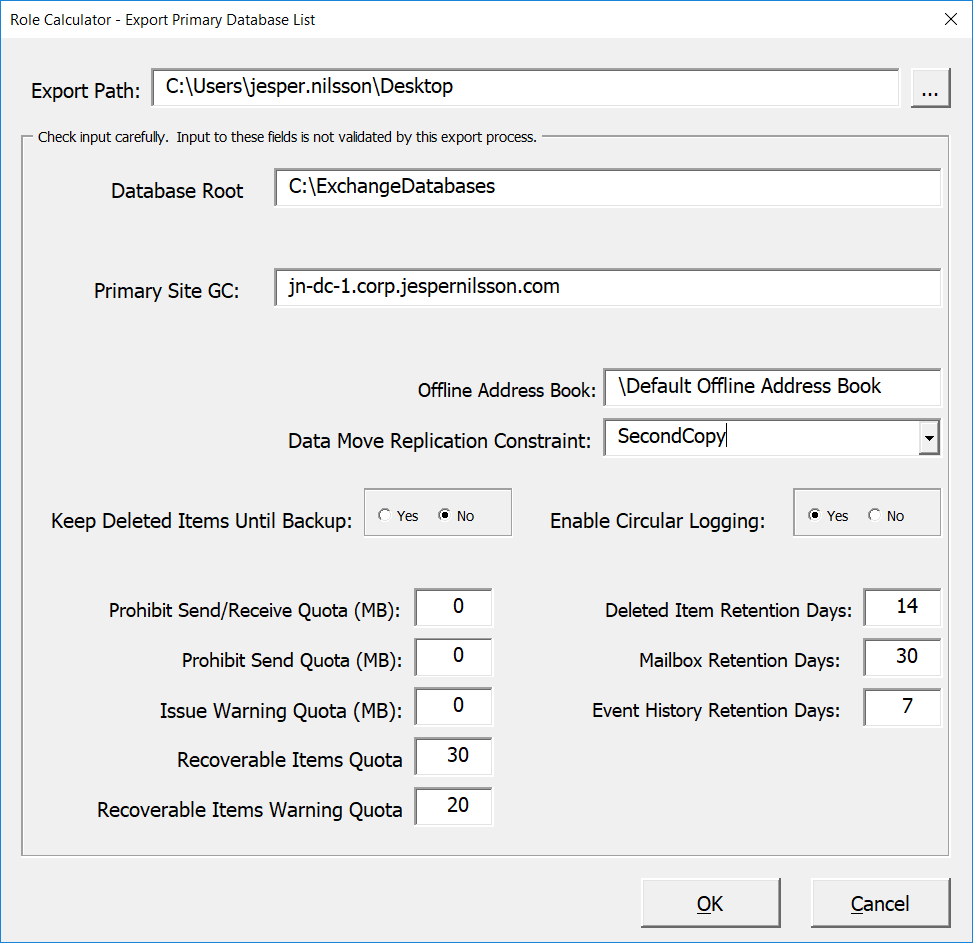
Next, we can generate the CSV file for the mailbox databases by clicking on the Export Primary Database List button. Again, the input that you provide in this dialog will depend on your design decisions for the environment you’re deploying. The default values align with Microsoft’s recommendations in the Preferred Architecture. As with the DAG configuration, you should research those options to make sure you understand the implications of each of them.
Finally, click on the Export Copy DB List button to create the input file for the mailbox database copies script. For that script, there is only the need to specify the export path for the input file MailboxDatabaseCopies.csv. The script that configures the database copies also uses information in the MailboxDatabases.csv file.
Using the Exchange Deployment Scripts
The deployment scripts themselves are generated by clicking the last button, Export Role Calculator Scripts. You can open each script in the PowerShell ISE or your favorite PowerShell code editor to see help information and instructions for running the scripts.
Before using the scripts generated by the Exchange Server Role Requirements Calculator, we need to have Exchange Server installed onto the servers, and the storage disks present and ready for formatting and mounting.
The deployment scripts are run in the following order:
- DiskPart.ps1 to configure the storage volumes.
- CreateDAG.ps1 to create the database availability group and add your Exchange servers as DAG members.
- CreateMBDatabases.ps1 to create and configure the mailbox databases.
- CreateMBDatabaseCopies.ps1 – to add copies of the mailbox databases on other DAG members, and configure any lagged copies.
Although this may all seem like more work than just manually installing and configuring your DAG, by investing the time up front you will avoid human errors during the configuration. Also, you now have a repeatable process for sizing and deploying Exchange servers. And if you save the calculator, CSV files, and scripts, you will also have a basis for the documentation of the newly deployed Exchange servers and DAG.


Thank you for your post. I Like to know if i want to select to virtual or physical server, which one is the best option? What does it depend on? Thank you.
Finally a great article about DAG configuration
The best for me many thank sir.
Hi Jesper, So many thank’s for best describe the hole Exchange Server Role Requirements Calculator story to us.
A well-done article…Thanks
Thank you! Hope it helps. ?
Thanks for publishing the great article!
Glad you liked it! ?