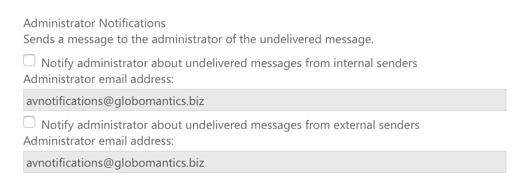
I stumbled across this little quirk while I was preparing some content for my upcoming Office 365 security course. In my demo tenant I wanted to reset the default malware filter policy in Exchange Online Protection to its original settings. However, I found that even though I can turn off setting such as the administrator notifications, the Exchange admin center won’t let me remove the email addresses.

The same goes for other options such as custom notification texts. You can change the text, but not remove it entirely. I even tried just a blank space, but that didn’t work. For whatever reason, the web admin portals just won’t let you clear out certain settings.
I considered just ignoring the problem, but then I thought about when it might actually be useful to clear those settings. Perhaps an evaluation of EOP has been completed, and you want to reset the policy to its original settings… a bit of a stretch I guess. Still, it’s nice to know that it can be done, especially when I happen to need it for this course content. The solution, as with many things, is to use PowerShell.
For reference, here’s the default malware filter policy settings for a new Exchange Online organization. This assumes that the default policy in the tenant is named “Default”, which is the default name for the default policy. I’ve removed a few lines from this output that are not relevant.
PS C:\> Get-MalwareFilterPolicy -Identity Default | fl


CustomAlertText                        :
CustomInternalSubject                  :
CustomInternalBody                     :
CustomExternalSubject                  :
CustomExternalBody                     :
CustomFromName                         :
CustomFromAddress                      :
InternalSenderAdminAddress             :
ExternalSenderAdminAddress             :
BypassInboundMessages                  : False
BypassOutboundMessages                 : False
Action                                 : DeleteMessage
IsDefault                              : True
CustomNotifications                    : False
EnableInternalSenderNotifications      : False
EnableExternalSenderNotifications      : False
EnableInternalSenderAdminNotifications : False
EnableExternalSenderAdminNotifications : False
EnableFileFilter                       : False
FileTypes                              :
ZapEnabled                             : True
Note that the BypassInboundMessages and BypassOutboundMessages options can’t be changed in EOP (they are for Exchange on-premises only).
So to revert the default policy to the default settings, the following command is run in an Exchange Online PowerShell session.
PS C:\> Set-MalwareFilterPolicy -Identity Default `
-CustomAlertText $null `
-CustomInternalSubject $null `
-CustomInternalBody $null `
-CustomExternalSubject $null `
-CustomExternalBody $null `
-CustomFromName $null `
-Action DeleteMessage `
-CustomNotifications $False `
-EnableInternalSenderNotifications $False `
-EnableExternalSenderNotifications $False `
-EnableInternalSenderAdminNotifications $False `
-EnableExternalSenderAdminNotifications $False `
-ZapEnabled $True
Excluded from that command are the CustomFromAddress, InternalSenderAdminAddress, and ExternalSenderAdminAddress. Those settings can’t be nulled. If you try, you’ll receive an error along these lines:
PS C:\> Set-MalwareFilterPolicy -Identity Default -CustomFromAddress $null

Cannot process argument transformation on parameter 'CustomFromAddress'. Cannot convert null to type
"Microsoft.Exchange.Data.SmtpAddress".
I did some testing to see if there was another way to clear those settings. One approach I tried was to create a brand new malware filter policy in PowerShell, then make that new policy the default. In doing so I caused both the EAC and the Security & Compliance Center web interfaces to break. After waiting to see if the errors would clear on their own, I gave up on that approach and rolled the change back.
In my command above I also excluded the list of file types for attachment blocking. The FileTypes option is blank until you enable the file filter, when it is automatically populated with the following file types:
PS C:\>

ace
ani
app
docm
exe
jar
reg
scr
vbe
vbs
If you later disable the file filter, the list of file types remains in the policy but has no effect on mail flow. If you modify or remove the list of file types, EOP won’t put them back for you if you re-enable the file filter later on. You can null the file types list with the following command.
PS C:\> Set-MalwareFilterPolicy -Identity "Default" -FileTypes @()
If you want to restore the default set file types for attachment filtering, the following commands are used.
PS C:\> $filetypes = @("ace",
"ani",
"app",
"docm",
"exe",
"jar",
"reg",
"scr",
"vbe",
"vbs")

PS C:\> Set-MalwareFilterPolicy -Identity Default -FileTypes $filetypes


