But a Better Choice is Plain Old PowerShell
Announced in message center notification MC289245 (Oct 4, 2021, Microsoft 365 roadmap item 82708), the ability to invoke an Azure Cloud Shell session from the Teams admin center is now available in tenants. Apparently, the idea is to allow Teams administrators to perform tasks using cmdlets in the Microsoft Teams PowerShell module without having to install anything on a workstation. As discussed below, Cloud Shell can certainly run the Teams cmdlets, but the limitations imposed by the implementation are such that I don’t recommend using this approach unless you absolutely must.
Running the Cloud Shell
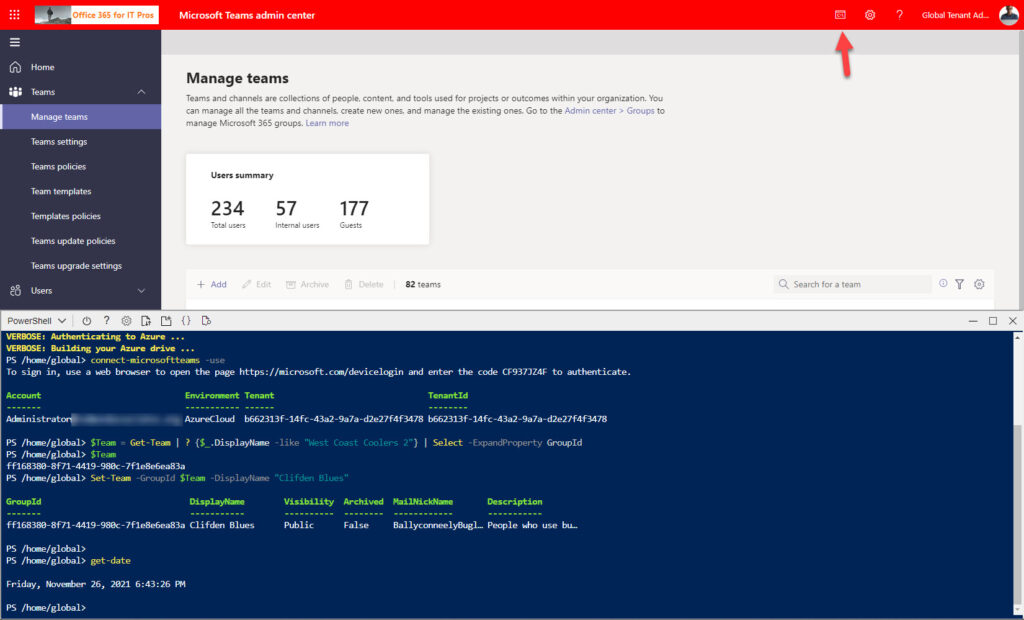
To start a new Cloud Shell session, click the shell icon in the browser bar. A pane opens beneath the admin center, connects to Azure, and creates a cloud drive. Behind the scenes, Azure creates a new PowerShell Core instance running on a Linux virtual machine on a Hyper-V host. In many respects, things haven’t moved on much since Vasil Michev investigated Cloud Shell three years ago.
Once connected to a shell session, you can run the Connect-MicrosoftTeams cmdlet to connect to Teams and load the cmdlets from the module. After loading the module, you can run its cmdlets (Figure 1).
Not Just the Teams Admin Center
The same functionality is available if you start a Cloud Shell session from the Microsoft 365 admin center. In other words, the news is not that you can start Cloud Shell from the Teams admin center. Rather, it’s that Microsoft has done the engineering to make the Teams cmdlets available to Cloud Shell, no matter from where you create a Cloud Shell session. I was able to run Teams cmdlets in Cloud Shell from the Microsoft 365 admin center, Azure portal, Teams admin center, and the Azure mobile app for iOS (I wouldn’t recommend the latter).
Azure Subscription Required
Before being able to connect to Cloud Shell from the Teams admin center, you must sign in with an account connected to an Azure subscription. The reason is that Cloud Shell sessions use Azure storage for the Linux virtual machine and to hold temporary data and store uploaded scripts. The subscription covers the use of Azure storage.
The need for an account to have a subscription isn’t an issue if you use the same account for both subscription management and Teams administration, which is very possible in a small tenant. In larger tenants, you must assign a suitable Azure role for a subscription to all accounts that you want to perform administrative actions involving that subscription.
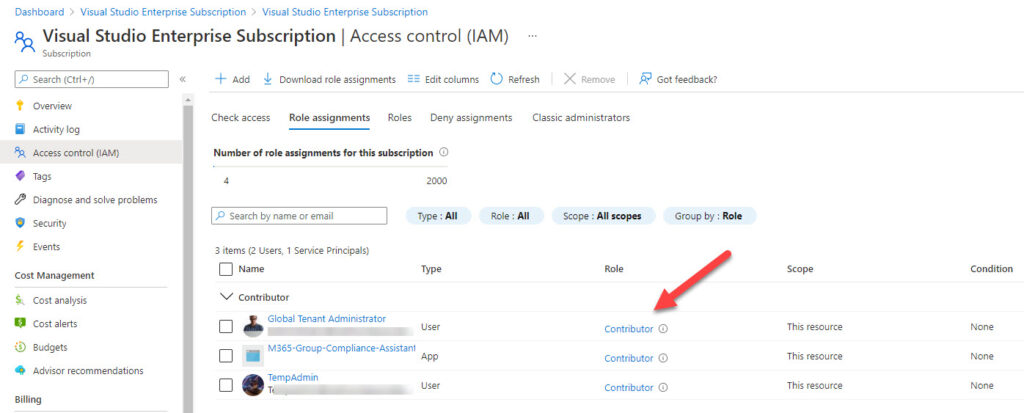
Typically, I assign the Azure coordinator role to the accounts used for tenant administration as that’s enough to use resources (like storage) linked to the subscription. You might find that a Azure different role (such as Co-Administrator) suits your circumstances better. Figure 2 shows accounts holding the Contributor role for a subscription in the Azure admin center.
Connecting to Teams
After satisfying the Azure requirements, we can connect to Teams. Microsoft’s documentation for Teams PowerShell says that you can run the Connect-MicrosoftTeams cmdlet without any parameters. Here’s what happens:
PS /home/global> Connect-MicrosoftTeams
WARNING: Interactive authentication is not supported in this session. Using parameter '-Identity' instead.

Account   Environment Tenant                               TenantId
-------   ----------- ------                               --------
MSI@50342 AzureCloud  a562313f-14fc-43a2-9a7a-d2e27f4f3478 a562313f-14fc-43a2-9a7a-d2e27f4f3478
Note that the account used is MSI@50342 rather than the account signed into the Teams admin center. This is a form of pseudo account used by Cloud Shell when it inherits authentication from a console like the Teams admin center. However, the cmdlets which came from the Skype for Business Online Connector (retired in February 2021) that are now included in the Teams module use a different endpoint and authentication mechanism. The net effect is that if you attempt to run these cmdlets, you get a 404 error:
PS /home/global> Get-CsTeamsMeetingPolicy
Get-CsTeamsMeetingPolicy: The remote server returned an error: (404) Not Found.
PS /home/global> Get-CsTeamsMessagingPolicy
Get-CsTeamsMessagingPolicy: The remote server returned an error: (404) Not Found.
Everything works if you sign into Teams with credentials for a specific account unless it uses multi-factor authentication. The problem with multi-factor authentication is that Cloud Shell runs in a terminal window, so there’s no way to display the interactive signin dialog. You can use basic authentication to sign into an account, and once connected, both the new and old (Skype) cmdlets run perfectly. Tenants should secure all administrator accounts with multi-factor authentication, so I don’t recommend this approach.
PS /home/global> $O365Cred = Get-Credential

PowerShell credential request
Enter your credentials.
User: Admin@office365itpros.com
Password for user Admin@office365itpros.com: ************

PS /home/global> connect-microsoftteams -Credential $O365Cred

Account                             Environment Tenant                               TenantId
-------                             ----------- ------                               --------
Admin@office365itpros.com           AzureCloud  as62313f-14fc-43a2-9a7a-d2e27f4f3478 as62313f-14fc-43a2-9a7a-d2e27f4f3478

PS /home/global> Get-CsTeamsFeedbackPolicy

Identity                  : Global
UserInitiatedMode         : Enabled
ReceiveSurveysMode        : EnabledUserOverride
AllowScreenshotCollection : False
AllowEmailCollection      : False
AllowLogCollection        : False
The solution and recommended approach is to use device authentication to sign into Teams. This method generates a unique identifier to input into a web page.
PS /home/global> Connect-MicrosoftTeams -UseDeviceAuthentication

To sign in, use a web browser to open the page https://microsoft.com/devicelogin and enter the code C5BQJLUJ8 to authenticate.
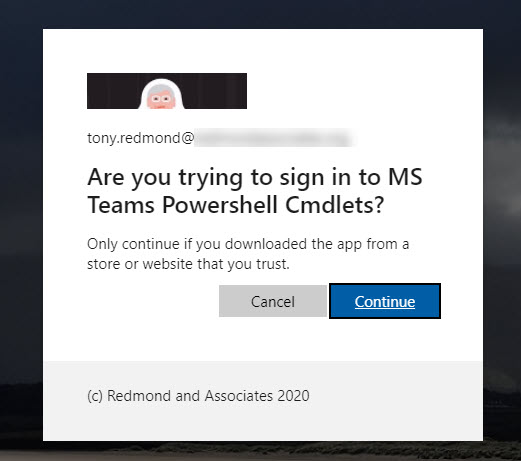
After inputting the code, you’re asked which account to sign in with and then to confirm that you want to use a Microsoft Graph app called MS Teams PowerShell Cmdlets (Figure 3).
For more information about how Microsoft Graph apps use device authentication, read this blog by Lee Ford.
Running PowerShell in the Cloud Shell
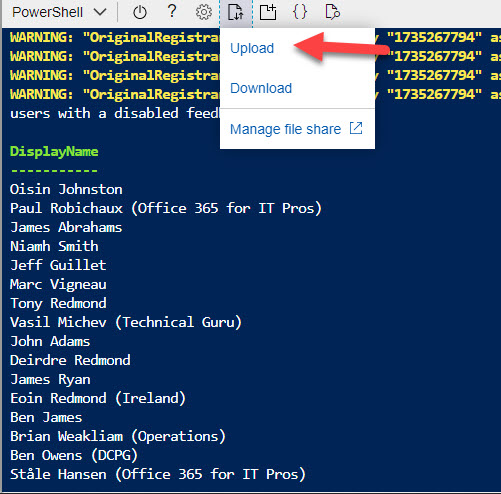
After you’ve connected using a suitable account, you can run any of the cmdlets included in the latest version of the Microsoft Teams PowerShell module (2.6.0 at the time of writing). You can also upload scripts from a workstation to Azure to allow them to run in Cloud Shell. Figure 4 shows the result of running a simple script to report the display name of Teams users with Get-CsOnlineUser.
Scripts uploaded to run in Cloud Shell run without a hitch if you limit them to Teams cmdlets and basic PowerShell commands like ForEach-Object, Select-Object, and Where-Object. However, you can hit problems if you don’t spell out command names fully. For example, it’s common to use Sort instead of Sort-Object in commands like:
Get-Team | Sort DisplayName
Cloud Shell protests if you run the command:
Get-Team | Sort DisplayName
/usr/bin/sort: cannot read: displayname: No such file or directory
This kind of hitch underlines the point that Cloud Shell is not the same as running PowerShell as you might normally do. It’s a separate environment with its own quirks and requirements, and if you expect to use it in production, you need to write code with Cloud Shell in mind.
Apart from making sure that basic syntax is correct, things become more complicated when you need to use cmdlets from other modules. Teams relies upon multiple components drawn from across the Microsoft 365 ecosystem and the harsh fact of administrative life is that for administrators to get work done, they often need to use cmdlets from other modules such as SharePoint Online or the Microsoft Graph SDK for PowerShell.
For instance, I couldn’t make Azure AD work in Cloud Shell from either the Teams admin center or Microsoft 365 admin center. A note in GitHub explains that Cloud Shell has a special function to override the default Connect-AzureAD function to avoid the need for users to re-enter credentials. Perhaps this is where the problem lies.
On the upside, you can connect to Exchange Online PowerShell using Remote PowerShell (which means that none of the REST cmdlets like Get-ExoMailbox are available). This works for Cloud Shell when invoked from either the Microsoft 365 admin center (Figure 5) or Teams admin center.
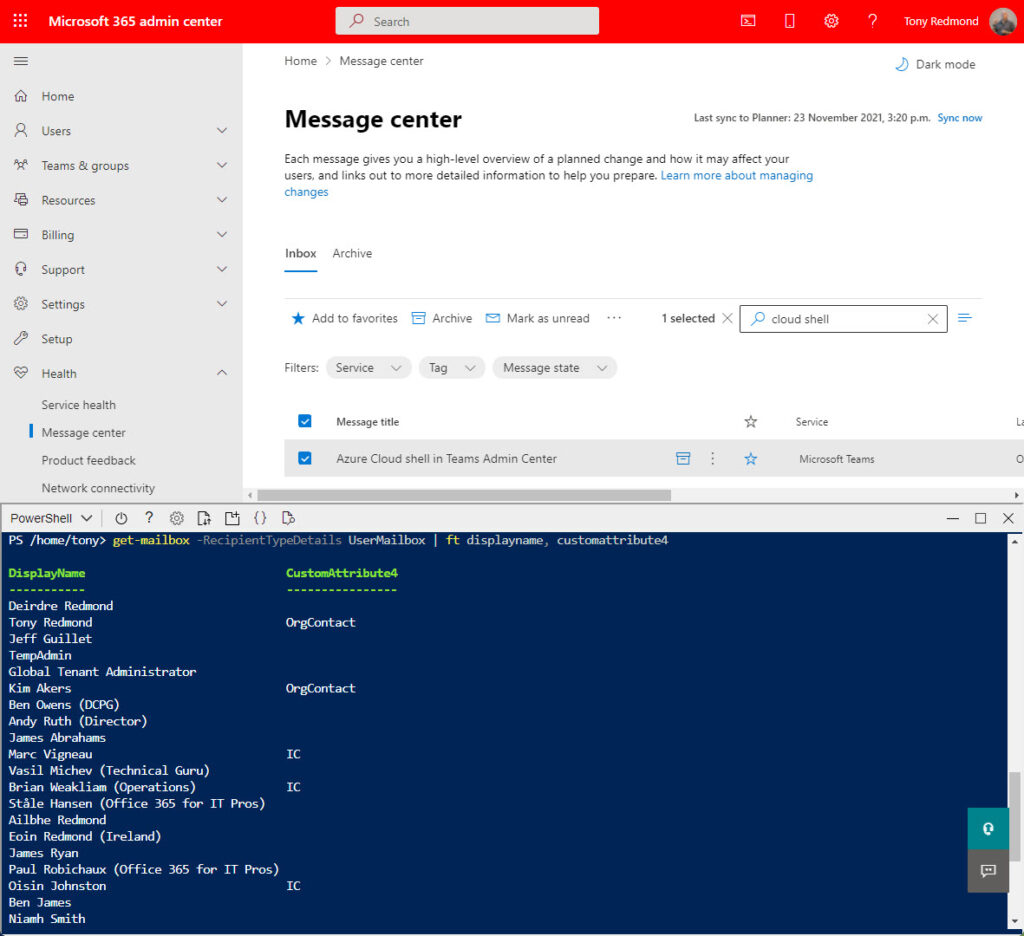
Overall, the need to be certain that all the modules used by scripts or to perform interactive tasks is a limiting factor for Cloud Shell.
Graph Access
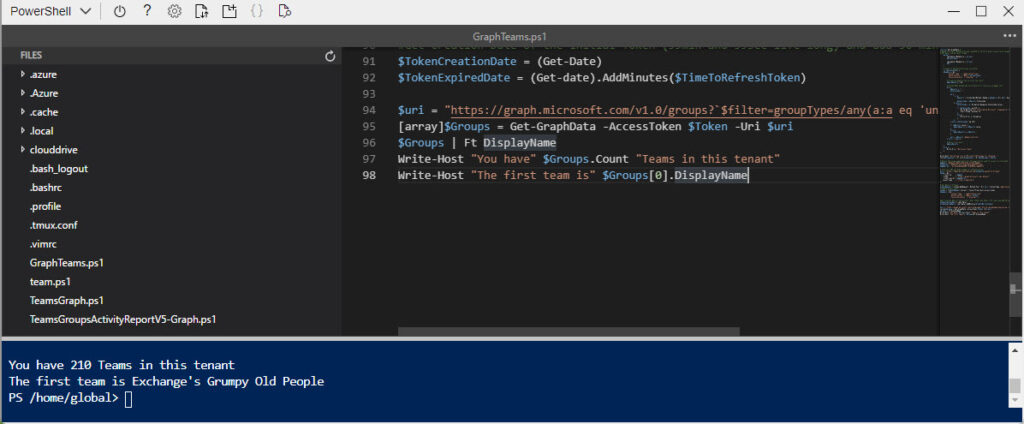
Cloud Shell supports Graph API calls using the Invoke-RestMethod or Invoke-WebRequest cmdlets, so this is also a viable method to access and process data where modules don’t work as expected. Figure 6 shows the use of the editor in Cloud Shell to modify a script which uses a Graph API call with the results of the script in the terminal window.
Too Many Limitations for Comfort
No doubt some will delight in Cloud Shell and use it in a very productive manner. However, Cloud Shell just doesn’t work for me. Messing around with modules in the hope that they will all work doesn’t seem like an effective way to work when I have a perfectly acceptable environment between standard PowerShell sessions and Visual Studio Code (for development). Everything works. All modules load. Commands run. Muscle memory overcomes any flaws that exist in how the setup functions. I doubt I will ever use Cloud Shell much, if at all. But that’s no reason for you not to try it out and make your own mind up.


I waited with bated breath for this feature to come to M365 (particularly for Teams management), only to be dismayed by these limitations when it arrived. Excellent roundup Tony – many thanks.
To me Cloud Shell is one of those “nice to have” things. It’s handy to do something quick, or on a new machine or a colleague’s machine where you don’t have all the modules installed already.
True. But how long does it take to download and install a couple of modules? (Rhetorical question).