
The End User Experience
In our previous article, we introduced the concepts behind entitlement management and put them in the context of creating a sample Access package. Now, we’ll go into detail about the user experience when requesting access to a package, and we’ll also cover some additional settings. Finally, in part three of this article series, we’ll cover the more advanced “users, not in your directory” scenario. Let’s get started.
Requesting access to a package
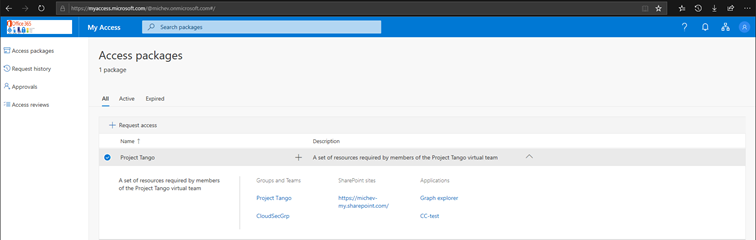
As an end-user, you can navigate to the newly introduced My access portal, where you will find a list of all the Access packages available. For the scenario we described in the first article, a single access package named Project Tango was created and made available for all users within our home tenant. Therefore meaning a user accessing the My access portal will be able to select and request access to the package. The user can also expand the entry to see additional information, such as the description and the list of individual resources to which access will be granted, as illustrated below:
Pressing the corresponding Request access button (or the little “+” button next to the description line) will initiate the Request access workflow. In our scenario, we opted not to require any approval or business justification, so the user can simply press the Submit button in order to get access to the package. They can still provide a business justification if they decide to do so, although it isn’t mandatory. Additionally, the user can choose to request access to the package for a specific period only, in which case they will need to provide a Start and End date from the corresponding date picker controls.

After pressing the Submit button, the user will be taken to the Request history tab, where they will get the status of any requests they have submitted. Handy filtering control is provided to narrow down the entries on this page based on the status of the corresponding request or the date they were submitted. In our case though, we only have a single entry, so we can simply select it and press the View link to get the full history of the request. Since no approval is required, we can see that the request was immediately auto-approved, access was granted, and a notification email was sent to the user. You can also press the Details link on the right pane to bring in additional information about the access request if needed. The user is also given the option to Cancel the request, in case it was submitted in error or no longer needed.

Navigating back to the Access packages tab will now list the corresponding package under the Active tab and selecting it will show the start date of the assignment as well as the expiration date, if any. The list of resources will also be presented, along with links to access each of them, as shown in the first screenshot above. The link to a Group or Team will launch the Access panel portal and give you details on the corresponding Security or Office 365 group, along with the links to open the corresponding mailbox or SharePoint Online site in the Office 365 group scenario.
Read more: How to Manage Guest Access in Azure Active Directory
What’s interesting is that there are no link to the Teams web app. The links to a SharePoint Online resource will take you directly to the corresponding site, and links to application resources will open in the context of the My apps portal and redirect you to the app in question.
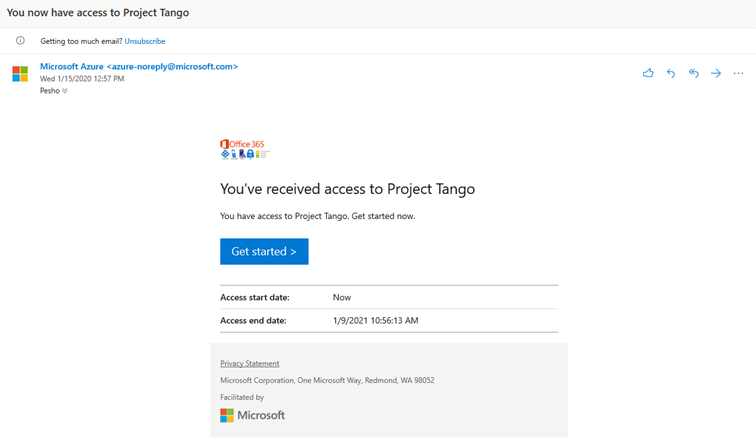
In addition to the controls already shown above, users will have the option to Remove access or Share the access package. Pressing the Share button simply gives you a dialog with the URL to the corresponding package in My access portal, which you can paste into an email or chat. For completeness, you can find below an example of the email notification sent to a user. The Get started link included in the email will also take you to the package page on the My access portal. Additional email samples can be found in the documentation.
Granting access as an administrator
After showing how a user can request access, let’s turn back to the admin experience. If the given access package has at least one policy that allows direct assignments, people with sufficient permissions will be able to create assignments from within the Azure AD blade. Eligible roles include the Global administrator and User administrator Azure AD roles, as well as the Catalog owner and Access package manager roles within entitlement management.
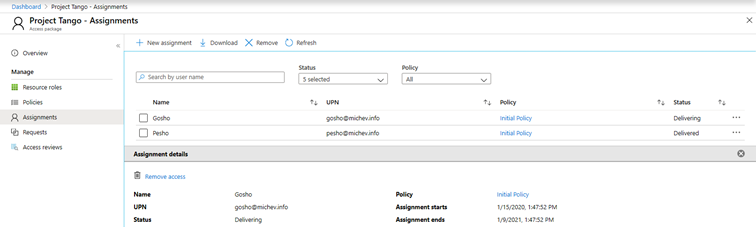
To create a direct assignment, navigate to the Access packages page, select the corresponding package and the click the Assignments tab. On this page, you will see a list of the currently active assignments for the given package, along with the corresponding policy.
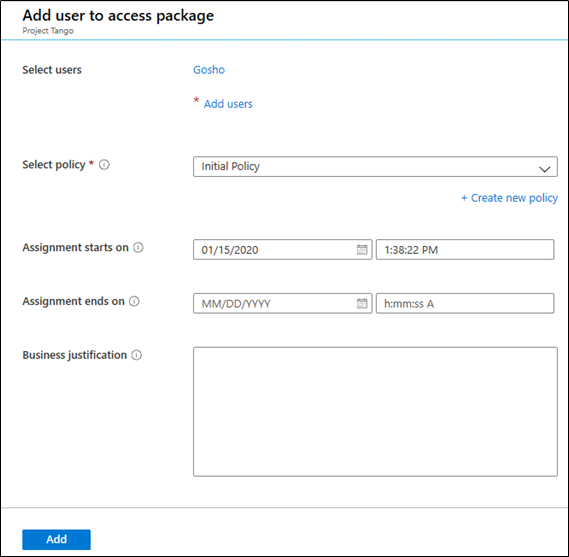
Pressing the New assignment button will take you to the Add user to access package page, where you will need to select the User(s) and the corresponding policy to be assigned. Optionally, you can provide an assignment start and end date as well as Business justification. If needed, you can also create a new policy for this specific assignment.
In addition, you will be able to Remove an assignment, or Download the list of assignments as a CSV file.
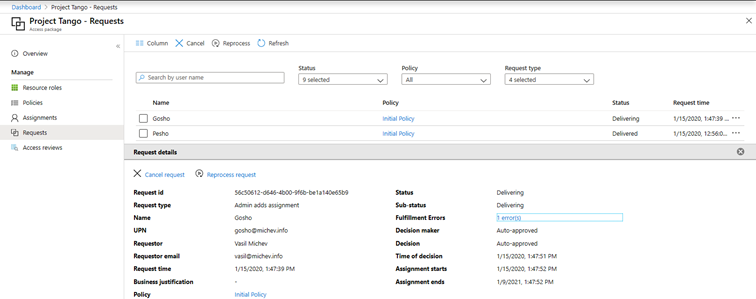
Under the Requests tab, you’ll be able to get detailed information about any requests for the given package, including the request type, requestor ID, any decisions made as part of the approval process and the corresponding timestamps, as illustrated on the screenshot below. You’ll also be given the option to Cancel a request or Reprocess it in case some error occurred.
Auditing and reporting
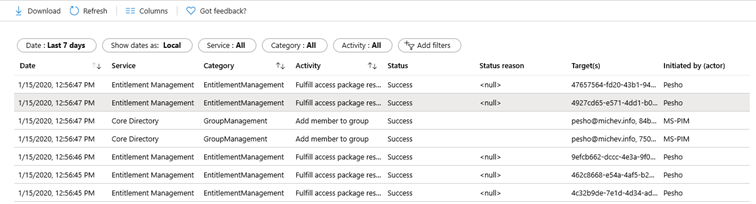
Entitlement management features robust auditing, which you can access by clicking the corresponding Audit logs tab. On the screenshot below, the events associated with the request we initiated as the end user are listed, including assigning the user as a group member. Similar set of events can be obtained for the case of directly assigning a package to a user.
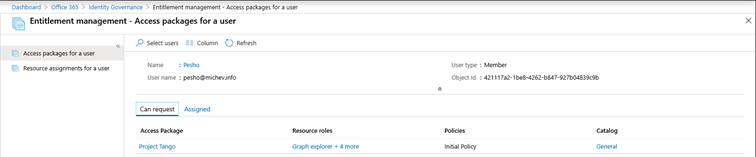
If crawling audit logs isn’t your thing, entitlement management also provides a reporting functionality. To access it, click the corresponding Reports tab. You can choose between two sets of reports. The first one, Access packages for a user, generates a list of packages a given user can request or is currently assigned to, as showcased below. For each package, you will see the list of roles and the set of policies allowing access for the given user. Convenient links to the corresponding Access package, Catalog and included resources takes you directly to the corresponding page in the Azure AD portal.
Alternatively, you can run a report to generate a list of Resource assignments for a user, as in the set of resources he has been granted access to via any access package. In the case of our end user, this includes the set of five resources part of the Project Tango access package. As above, links that can take you directly to the corresponding catalog, access package or policy page are included.
Multiple policies scenario
So far, we’ve only covered the simplest of scenarios – a single Access package within the Global catalog, with a single policy used to assign it to users within the organization. Entitlement management allows more complex solutions to be addressed as well. Multiple catalogs can be defined within the organization in order to apply restrictions to the resources included in an access package. Robust delegation controls allow you to offload the process of creating, managing or assigning a package to users other than the Global/User administrators. And you can even have multiple policies for the same access package, allowing you to granularly control the request, approval and lifecycle settings for different sets of users.
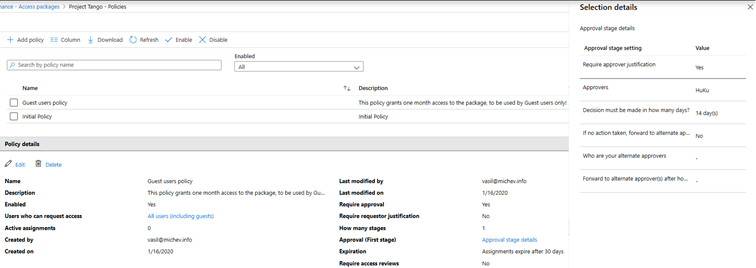
To illustrate the multiple policies scenario, we can open the settings of a given Access package and navigate to the Policies tab. The original policy we configured as part of the package creation process will be listed as Initial policy and can be modified as needed. But if needed, we can create additional policies, to address scenarios where the same set of resources needs to be assigned to different groups of users, with different approval/request settings, or different expiration. For example, you can have one policy that gives permanent access to the set of resources for all members of the Development department without the need of approval, and another policy that grants time-limited access to Guest users, upon receiving an approval from the department manager.
To add additional policies, press the Add policy button. Under the Basics tab, provide a Name and Description, then move to the Requests tab to configure the policy settings. The screen will look similar to the one we saw in our first article; however, we will now select All users (including guests) and also configure an Approval. A wide range of settings exists here, including multi-stage approvals and justification, which you can read about in the official documentation. For our purposes, we simply toggle the Require approval setting, select single stage only, and designate a specific person as the approver.
On the Lifecycle tab, we can restrict the validity of the assignment to 30 days, while at the same time Allow users to extend access via the corresponding setting. We can also use the Require approval to grant extension toggle to assert additional control over the extension process. Lastly, we can configure periodic Access reviews, allowing the user or an appointed person to attest to the need to continue using the resources in the given Access package. For these and other policy controls and screenshots from the creation process, refer to the documentation.
Once you create the new policy, you can select it to review the settings and press the Approval stage details link to bring the corresponding pane, listing all the approval-related settings you’ve configured:
On the end-user side of things, if multiple policies apply, entitlement management will follow the principle of what has the least privilege. User- or group-specific policies have priority over org-wide ones, and in some cases, the system might opt to not display a given policy, or automatically select the stricter one. In other cases, the user will be given a choice between all the available policies when requesting access. Configuring multiple policies is just one example of the additional functionalities included in entitlement management. In our next article, we will cover even more advanced scenarios, such as automatically provisioning external users from connected organizations, multi-level approvals and more.


Great article, thank you! Would you know how to retrieve a list of all owners of all access packages and catalogues if possible?
Hallo Vasil.
Great article here. This is the only article I found covering the Multiple policies scenario.
You wrote: On the end-user side of things, if multiple policies apply, entitlement management will follow the principle of what has the least privilege. User- or group-specific policies have priority over org-wide ones, and in some cases, the system might opt to not display a given policy, or automatically select the stricter one. In other cases, the user will be given a choice between all the available policies when requesting access. Configuring multiple policies is just one example of the additional functionalities included in entitlement management.”
My questions:
– What is your source for Multi Policies Scenario? Has Microsoft published anything about it?
– In which cases – one example will be a great help – the system will give a choice between policies. I haven’t seen that one yet.
There’s an example here: https://docs.microsoft.com/en-us/azure/active-directory/governance/entitlement-management-request-access#select-a-policy